Many Linux users find it difficult to deal with a large amount of log files. ELK offers us a way out of these difficulties. ELK is a group of three software tools, e.g. ElasticSearch, Logstash and Kibana, which can be used to manage large log files or data on the Linux platform. It is very great and stress-free in practice. In this article, we will show you how to install ELK Stack on our Ubuntu 20.04 system. We’ll start with the implementation by logging in to the system first.
Update Ubuntu
Before installing and configuring ELK, we need to update our system. So open the console terminal using the key combination “Ctrl+Alt+T”. Use the apt-get query with sudo privileges to update the system as described below.
$ sudo apt-get update -y
Installation requirements
Before the ELK can be installed, some prerequisites must be installed and configured on the Ubuntu 20.04 system. These prerequisites include the JAVA Jdk, the wget repository, the transport-HTTP repository, Nginx, curl and gnupg2. So let’s start installing all these repositories and tools by using the apt-get command in the console with sudo privileges.
$ sudo apt-get install openjdk-11-jdk wget apt-transport-https curl gnupg2 -y

After a while, all these repositories and tools will be installed.
You can also cross the fixed version of “JAVA” on your system with the query as:
$ java -version
Now it’s time to install the “Nginx” repository in the Ubuntu 20.04 system if it’s not already installed. So, we ran the query below and pressed enter. It will ask for the password for the account. After you enter the password, the installation of “Nginx” will begin.
$ sudo apt-get install nginx

Tap “y” when asked if you want to proceed with the installation of “Nginx”. Otherwise, tap “n” to exit the installation.
Installation and configuration of ElasticSearch
To begin, users will need to set up “ElasticSearch” in Ubuntu 20.04. For this purpose, you first need to add the key to the system. To import the GPG key, you need to try the following instruction in the console and press Enter. Since the key has been added perfectly, the message “OK” will appear.
$ sudo wget –qO – https://artifacts.elastic.co/GPG-KEY-elasticsearch | sudo apt-key add -

To install Elastic Search, we need to add the library in the system. To do this, write the below query in the shell and tap “Enter”.
$ echo “deb https://artifacts.elastic.co/packages/7.x/apt stable main” | sudo tee –a /etc/apt/sources.list.d/elastic-7.x.list
Refresh the system again to apply the changes.
$ sudo apt update
Now we can finally install ElasticSearch in Ubuntu 20.04. Run the apt-get command shown in the image, enter the password for the installation and hit enter.
$ sudo apt-get install elasticsearch -y

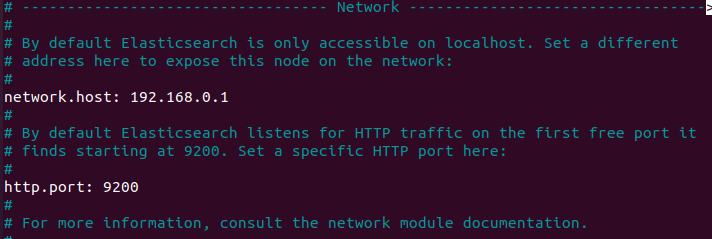
It may take 20 minutes for the installation to complete. Open the ElasticSearch configuration file to update its contents using the “nano” editor. You can try the command below, which shows the path to the configuration file.
$ sudo nano /etc/elasticsearch/elasticsearch.yml
After you open the file, uncomment the following lines as shown in the display below.
# network.host: Your-Ip-Address/localhost
# http.port: 9200
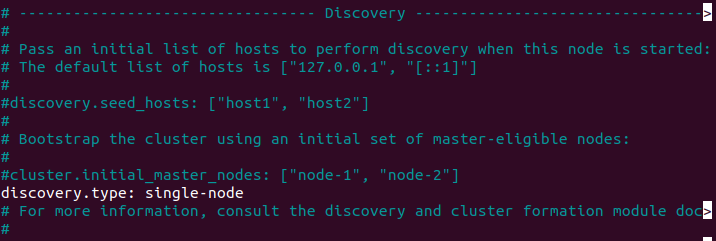
You can also paste the following line inside the discovery section of the file. Press “Ctrl+S” to save the changes. Exit the file with “Ctrl+X”.
# discovery.type: single-node
Try the three commands below one after the other to enable ElasticSearch.
$ sudo systemctl start elasticsearch
$ sudo systemctl enable elasticsearch
$ sudo systemctl status elasticsearch
Installing and configuring Logstash
To install Logstash, we use the same apt command, this time named “logstash”. Therefore, we tried the below query in the console and get it working.
$ sudo apt install logstash

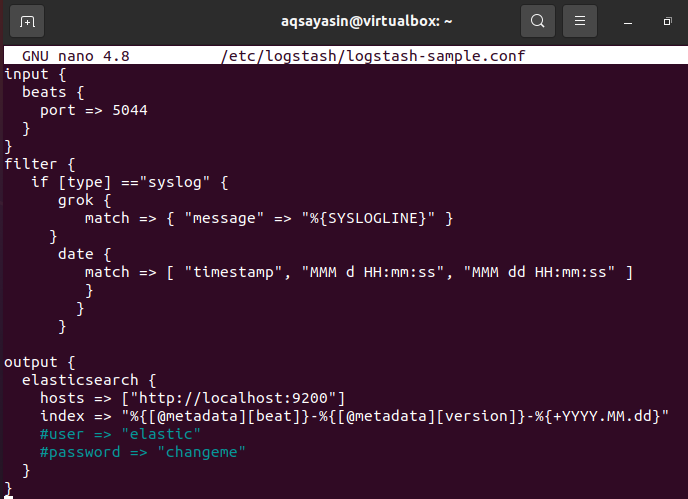
The configuration file for logstash can be in different places. You can use either of the two commands shown above the image. We found the command below to be efficient.
$ sudo nano /etc/logstash/logstash-sample.conf
You can see the script above the snap. You need to paste the “filter” part of the code into the document. Save the script with “Ctrl+S” and close the file with “Ctrl+X”.
Finally, run the command systemctl start, enable and status in the command line to enable logstash in Ubuntu 20.04.
Installation and configuration of Kibana
After configuring Logstash, it’s time to install Kibana. To install Kibana, we used the very similar “apt-get” command in the terminal shell to install it.
$ sudo apt-get install kibana

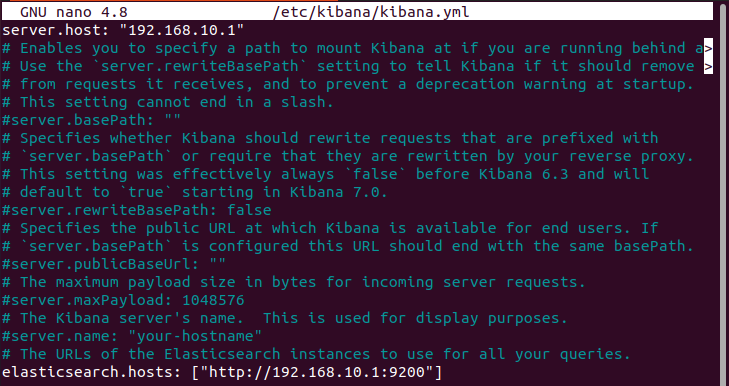
Now let’s open the configuration file for Kibana to update the configurations using the path given in the query below. Try the command with sudo privileges and hit enter.
$ sudo nano /etc/kibana/kibana.yml
After opening the file, add the following two lines with the update according to your localhost or remove the comments. Don’t forget to enable kibana with the systemctl command.
# server.host: “localhost”
#elasticsearch.hosts: [http://localhost:9200]
Installing and configuring Filebeat
Last but not least, Filebeat needs to be installed properly. Therefore, in our shell we used the apt query followed by the keyword “install” with the name of the tool “filebeat”.
$ sudo apt install filebeat

Now open the configuration file for filebeat to update it using the “nano” command in the shell as follows:
$ sudo nano /etc/filebeat/filebeat.yml
In the output area of ElasticSearch, update the line that can be seen in the figure below.
# hosts: [“localhost:9200”]

Now activate the modules of the Filebeat system with the mentioned command in the terminal.
$ sudo filebeat modules enable system

Try the given command to set up Filebeat:
$ sudo filebeat setup –index-management –E output.logstash.enabled=false –E ‘output.elasticsearch.hosts=[“localhost:9200”]’
At the end of the implementation, the user must use the “systemctl” command in the shell to activate the Filebeat tool.
Conclusion
To access the ELK Dashboard, try http://localhost:5601. This guide contains the installation and configuration of the ELK stack and the Filebeat tool. I hope you like it.