
Java is a popular programming language used to build a variety of apps and websites. But what is the real story of Java, and who uses it?
Java has been around since 1995. It was released by Sun Microsystems as a programming language for “smart” consumer devices, particularly those with multimedia capabilities. This included interactive television systems as well as some early smartphones. Much later on, in 2006, Oracle Corporation acquired Sun Microsystems, and with it the Java programming language. However, this isn’t why most people know about Java today.
Java came into its own as a web development tool. In the late 1990s, many companies saw the potential of publishing their content over the internet using a new technology known as “hypertext markup language” (HTML). HTML was an application of “hypertext,” which had been introduced by Sir Tim Berners-Lee at CERN. However, the problem with HTML content was that it lacked interactivity. Therefore, if you wanted to do things like checkboxes or clickable images, you needed something more advanced than basic HTML.
Java was designed specifically to fill this need. By writing Java code and embedding it within your websites, you could create interactive web pages where users could click on buttons, play games or watch videos online using their browsers (e.g., Netscape Navigator). This was exciting for businesses because it allowed them to communicate with more customers over the internet in different ways. For example, some people would be interested in reading an online newspaper, while others might want to conduct real-time stock market transactions. Other applications included delivering new software updates over the internet or playing games on remote servers. Eventually, Java helped power one of the most popular inventions of the 21st century – the mobile app.
Java also got another boost when it was used by Google in their AdWords system for paying adverts to appear on websites with particular content. Over time, more and more businesses realized that if they could get their ads onto these sites, then they would be able to interact with even more customers than before! Accordingly, the demand for Java developers increased exponentially through this period of explosive growth in business-to-consumer (B2C) e-commerce.
Today we know that many e-commerce websites (and some other types of sites) use Java to develop and maintain user accounts, validate credit card transactions and keep track of inventory.
This tutorial will walk you through the steps to install Java and set it up to run on your AlmaLinux 8/Centos 8/Rocky Linux 8 machine. It then shows you how to write and run a “Hello, World!” program in Java. This is a very simple example that will give you your first taste of interacting with Java.
Prerequisites
In order to follow the steps in this tutorial, you will need:
- An internet connection. Java can be used interactively by a person at a computer, but it was designed to be used as a software component by programs and devices running on the internet, so you will need an active connection to the web.
- Root access to your AlmaLinux 8/Centos 8/RockyLinux 8 machine.
Updating the System
It’s always a good idea to make sure that you have the latest updates for your system. To do this, open up your terminal window and run the following command.
sudo yum update -y
Installing Java
There are three different editions of the Java platform in current use: Micro Edition (ME) for embedded systems, Standard Edition (SE) for desktop and server applications, and Enterprise Edition (EE). This guide will go over how to install the Standard Edition (SE).
There are two different Java SE packages that you can install on Centos 8. Oracle’s official distribution of Java SE, or a self-supported distribution from AdoptOpenJDK.
You’ll want to use the Oracle JDK because that is the official provider of Java, and it is supported by most web browsers. You also get the least amount of bundled adware with Oracle’s version.
Take note that to use the OpenJDK, you will have to accept a license agreement for usage of Java SE, which includes the right to create derivative works “as needed for compatibility purposes”.
By default, the CentOS 8 repository comes with the latest version of OpenJDK, which is OpenJDK 11. So we can install it with the yum command.
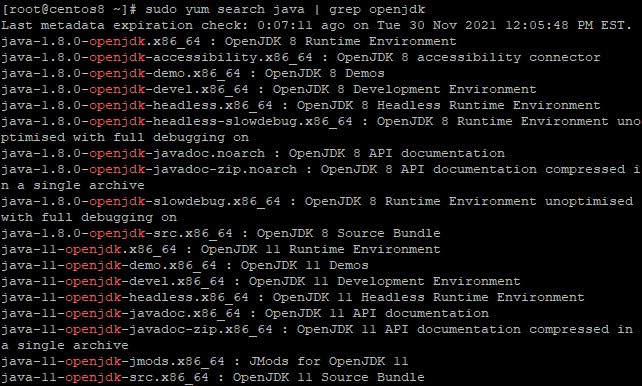
You can run the command below to list all the available versions of OpenJDK in your CentOS 8 repository.
sudo yum search java | grep openjdk
Run the command below to install the OpenJDK 11 JDK. JDK(Java Development Kit) is a set of tools that includes the Java Runtime Environment (JRE), Java compiler, etc.
sudo yum install java-11-openjdk -y
After installing OpenJDK 11, verify it by running the following command in your terminal window. The output should confirm that you’re running the OpenJDK 8 JDK:
java -version
The output should look like this.

Managing Multiple Versions of Java
It’s very possible to install multiple versions of Java on the same machine. For better or worse, lots of software in the world is written to work with certain versions of Java. If you want to be able to run this older stuff, then you need to have multiple versions installed.
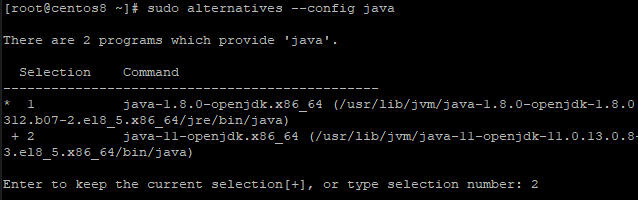
You may also want to set one of these versions as the default. You can do this with the alternatives command. This command manages symbolic links that tell your system which commands to run when you call them.
Run the alternatives –config java command to call up the Java configuration tool. You can then select your preferred version of Java to use by default, and specify the “Symbolic link” target for your desired version.
sudo alternatives --config java
You will get an output like the one below. Make sure you mark your desired version in the “active” state.
Type in a number and press Enter to choose the default Java version. For example, we’ll be choosing OpenJDK 11 as the default, so we pressed Enter on “2”. You can run the java -version again in your terminal window to verify that it is configured correctly.
Testing the Installation
Now that you have Java, you can write a basic “Hello World” program, compile, and execute it using Java to test your installation.
First, create a new directory with the name of your choice to hold your Java source code. We will go with “hello-world” in this example. You can do this by running the command below.
cd && mkdir hello-world && cd hello-world
Now, create a new file with the name “helloworld.java” inside of the newly-created directory. In this example, we’ll be using nano, but you can use any text editor you like.
sudo nano helloworld.java
Now, copy and paste the following code to your file. It is possible to write Java source code with no line endings for maximum compatibility, but this practice is not recommended due to portability issues and security concerns, so we’ll stick with the usual line endings.
public class HelloWorld {

  public static void main(String[] args) {

    System.out.println("Hello World, Linuxways");

  }

}
Where:
- System.out.println (“Hello World”): This line is an example of Java’s command-line interface. It calls the “println” method on the object named “System”, with a parameter telling it to display whatever text follows between quotes after the call, in this case, “Hello World”.
- public static void main(String[] args) {: This line defines the main method of the class. The words “public static” mean that other classes may call this method. “void” means it returns nothing, and “(String[] args)” means that this method has one parameter, an array of strings. The name of this parameter is “args”, which isn’t descriptive, but saves some keystrokes. Finally, the body of the “main” method appears within braces and starts with an opening curly brace on the second line and closes on the last.
- }): This is the closing brace for the main() method.
- public class HelloWorld {: This line starts the definition of a class named “HelloWorld”.
Finally, save and exit the file by pressing Ctrl+X, Y, and Enter.
Now that you have our source code written and located in in your current working directory. Run the command below to see if the file is already in your directory.
ls -l
If you see the newly created in your current working directory, it worked! Otherwise, check your typing carefully until you have successfully written a “helloworld.java” file containing the contents explained above.
Sample output:

Next, you can compile the file with the javac command, which comes as part of your JDK. You can run it with the file name as argument.
javac HelloWorld.java
If everything goes well, you should get no errors. The command above will now give out any output. However, a new file named “HelloWorld.class” should have been created inside the current working directory.
Sample output:

The last step is to execute the Java program. You can do this by running the java command with the fully qualified name of your “main” method as an argument.
java HelloWorld
You should be seeing the words “Hello World, LinuxWays” in your terminal. Congratulations! You’ve just written, compiled, and executed your first Java program.
Sample output:
![]()
![]()
Conclusion
That’s it. You now have a functioning installation of Java, which you can play around with however you like to get a feel for how programming works in Java. Please comment below if you have any questions or suggestions.