MongoDB is an open-source document-oriented database program. It is a NoSQL, high-performance, and scalable database system that uses JSON-like documents with schemata. MongoDB stores data in flexible, JSON-like documents with dynamic schemata instead of enforcing a rigid relational structure. It has better horizontal scalability than traditional RDBMS.
MongoDB is a NoSQL program which means we do not have to configure it for relational databases. It also has automatic sharding and replica set configurations. So, there is no need to have server-side scripting knowledge to use this dataBase system, unlike other systems such as MySQL, Oracle DBMS, etc. We would require only Web development skills to create our web application around MongoDB.
In this guide, we will walk you through the steps to install MongoDB on a Rocky Linux 8 system.
Prerequisites
Before you begin the installation of MongoDB, make sure that your system meets the following prerequisites.
- MongoDB runs on an x86_64 hardware platform. So you need to have a 64-bit operating system to install MongoDB.
- MongoDB requires at least 1 GB of physical RAM for production use. So you need to have a server with a minimum: 1GB of RAM, 2 Core Processors, and 15GB of free space for installation purposes.
- A non-root user with sudo privilege set up on your system.
Let’s follow the steps to install MongoDB on Rocky Linux 8.
Step 1: Updating the System Packages
To update the system packages, run the following commands.
sudo dnf -y update
Consider rebooting the system after updates are done.
sudo reboot now
After reboot, log back into the system using the same non-root user and proceed to the next step.
Step 2: Adding the MongoDB RPM Repository
The MongoDB packages is not included in the default Rocky Linux 8 repositories, Therefore, we need to add the MongoDB repository in order to install it. In this guide, we will use the MongoDB 4.4 stable version from the developer.
cat > /etc/yum.repos.d/mongodb.repo << 'EOL'
[mongodb-org-4.4]
name=MongoDB Repository
baseurl=https://repo.mongodb.org/yum/redhat/$releasever/mongodb-org/4.4/x86_64/
gpgcheck=1
enabled=1
gpgkey=https://www.mongodb.org/static/pgp/server-4.4.asc
EOL
Step 3: Installing MongoDB on Rocky Linux 8
Once the MongoDB repository has been added, rebuild the system repository cache with the dnf update command.
sudo dnf -y update
To check if the repository is correctly set, use the following command.
sudo dnf repolist
You should get an output like the one below.

Once the MongoDB repository has been added, run the following command to install MongoDB.
sudo dnf install -y mongodb-org
Once the installation is complete, you must start the MongoDB service and configure it to start automatically when the system is booted.
sudo systemctl start mongod
sudo systemctl enable mongod
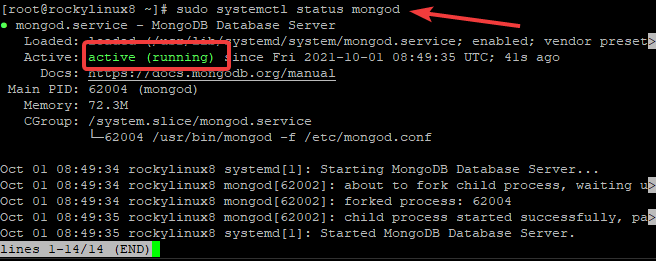
To check the status of MongoDB, run the following command.
sudo systemctl status mongod
You should get an output like the one below.
If you get Failed to start mongod.service error, run the following command to reload the daemon and try to start the Mongodb service again.
sudo systemctl daemon-reload
sudo systemctl start mongod
You can check if the MongoDB service has run successfully by checking its log file. You should see a line that indicates that Mongod is listening to requests and waiting for connections.
tail /var/log/mongodb/mongod.log

Step 3: Securing MongoDB
As of MongoDB version 3.0, only connections from the local Unix socket are accepted, rather than connections from the broader Internet. However, since authentication is still disabled by default, users who have access to your server where MongoDB is installed may access databases. Therefore, you should add an administrative user and then configure authentication.
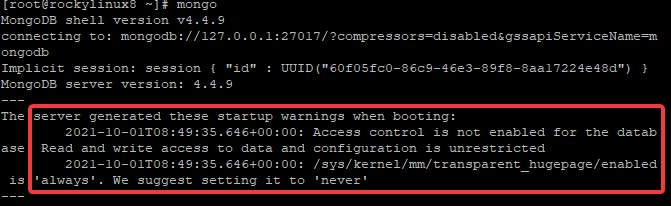
First, run the following command to connect to the Mongo shell.
mongo
This command will connect to the MongoDB instance installed on your system. This command will give you some warnings because you have not set the authentication yet.
Next, run the following command to connect to the admin database.
use admin

Once you are connected to the admin database, we will use the db.createUser method to create an administrative user with its username, password, and roles.
In this example, we will create an administrative user called osnote with the role of readWriteAnyDatabase.
db.createUser(

{

user: "osnote",
pwd: passwordPrompt(),
roles: [ { role: "userAdminAnyDatabase", db: "admin" }, "readWriteAnyDatabase" ]

}

)
Hit Enter to execute the command above. If the command syntax is correct, you should get a prompt to enter your password.
Provide a secure password and hit Enter on the keyboard. You will get a Successfully added user message.
To show the newly added user to the system, run the following command.
show users
To exit the Mongo shell, type exit at the prompt.
After adding an administrative user, you need to configure authentication in MongoDB. To do this, you need to stop the MongoDB service and then edit the configuration file, known as mongod.conf. To stop the MongoDB service, use the following command.
sudo systemctl stop mongod
Once the service is down, edit the configuration file using your favorite text editor. We will use nano.
sudo nano /etc/mongod.conf
Scroll down to the #security line, uncomment this line by removing the # character.
Add the following line right below the security line.
authorization: enabled
The security line should look like this when you are finished.

Save the file by hitting CTRL+O on your keyboard, then hit Enter on the keyboard to confirm overwriting the existing file. Finally, press CTRL+X to exit the nano editor and return back to your shell.
Start the MongoDB service again by running the following command.
sudo systemctl start mongod
Then restart the daemon for the changes to take effect.
sudo systemctl restart mongod
Now the MongoDB service is using authentication. Now when users connect to MongoDB or want to modify any data, they will be prompted for a password.
Step 4: Testing the MongoDB Installation
Now that everything with MongoDB is installed and set up, you can start using it.
To create a new database, use the use command.
use database_name
Where database_name is the name of the database that you want to create.
If the database_name database already exists, this command will switch to that database database_name. If not, this command will create a new database and switch to the newly created database.
Let’s create a new database called linux
use linux
You should get an output like the one below.
![]()
![]()
To show all databases on your system, run the following command:
db
You should get an output like the one below.

We can add data to the database by using the db.collection.insertOne() method.
db.linuxversion.insertOne(
{ "rocky linux" : “8.4”,
"ubuntu" : "22.04",
"debian" : "11",
"almalinux" : "8"
}
)
To show the collections in the database, run the following command.
show collections
You will get a list of all your entries in the collection if you have multiple entries.

To show all the documents from a collection, run the following command.
db.collection.find().pretty()
The pretty() method in the Mongo universe is known as paging. It will show all the results in a neat way, easy-to-read, enabling the user to go through the complete data.
Let’s show all the documents from the linuxversion collection we created above.
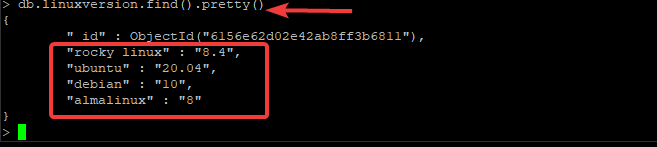
db.linuxversion.find().pretty()
This command will show all the documents from the linuxversion collection we created above.
Conclusion
In the above guide, you have learned how to install Mongo 4.4 on a Rocky Linux 8 system, how to create an authentication user for MongoDB, how to start and stop the service, and how to use the Mongo shell. Happy management!
For more information, please visit the MongoDB official website.