Debian 12, known as “Bookworm,” is a stable and secure operating system favored by many for web hosting and server management. One common requirement for web servers is the installation of PHP, a popular scripting language used for developing dynamic websites and applications. As of the latest updates, PHP 8.3 is the cutting-edge version, offering numerous improvements and new features.
This guide will walk you through the process of installing PHP 8.3 on Debian 12.
Prerequisites
Before you begin, ensure you have the following:
- A Debian 12 system with root or sudo privileges.
- Basic knowledge of the terminal and command-line operations.
- An updated system.
Step 1: Update Your System
First, it’s good practice to update your system to ensure all existing packages are up to date. Open your terminal and run:
sudo apt update && sudo apt upgrade -yThis command updates the package lists and upgrades the installed packages to their latest versions.
Step 2: Install Required Dependencies
Before installing PHP 8.3, we need to ensure that some basic dependencies are installed. Run the following command:
sudo apt install software-properties-common ca-certificates lsb-release apt-transport-https -yThese packages help manage software repositories, SSL certificates, and HTTPS connections.
Step 3: Add the SURY Repository
Ondřej Surý maintains a repository that includes the latest PHP versions for Debian-based systems. We need to add this repository to install PHP 8.3.
sudo add-apt-repository ppa:ondrej/phpThis command adds the repository to your system.
Step 4: Install PHP 8.3
With the repository added, you can now install PHP 8.3. Use the following command:
sudo apt update
sudo apt install php8.3
This will install PHP 8.3 along with some common modules.
Step 5: Verify PHP Installation
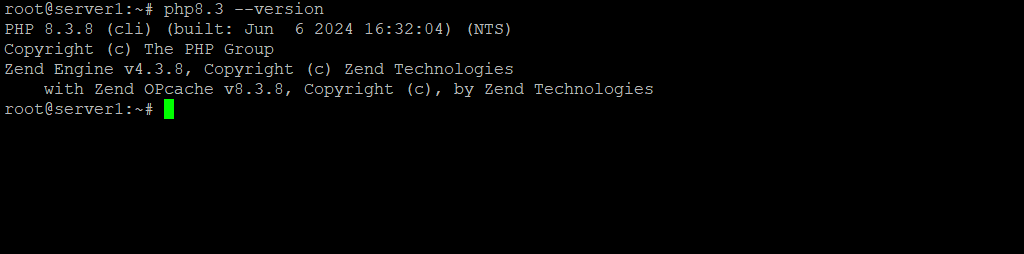
After installation, it’s important to verify that PHP 8.3 is correctly installed. You can check the installed PHP version by running:
php8.3 --versionor use just:
php -v
You should see an output indicating that PHP 8.3 is installed.
Step 6: Install Additional PHP Modules (Optional)
Depending on your web application requirements, you may need additional PHP modules. Here’s how you can install some commonly used PHP extensions:
sudo apt install php8.3-cli php8.3-fpm php8.3-mysql php8.3-curl php8.3-gd php8.3-mbstring php8.3-xml php8.3-zip -yThis command installs the PHP CLI (command line interface), FPM (FastCGI Process Manager), and various other extensions like MySQL, cURL, GD, Mbstring, XML, and ZIP.
Step 7: Configure PHP (Optional)
After installation, you might need to adjust some PHP settings depending on your needs. The PHP configuration files are located in /etc/php/8.3/. The primary configuration file is php.ini.
For example, to edit the php.ini file for the FPM service:
sudo nano /etc/php/8.3/fpm/php.iniMake your changes as needed, then save and exit.
Step 8: Restart PHP-FPM (if applicable)
If you’re using PHP-FPM, restart the service to apply any changes made in the configuration files:
sudo systemctl restart php8.3-fpmYou can also enable PHP-FPM to start on boot with:
sudo systemctl enable php8.3-fpmStep 9: Test PHP with Apache or Nginx
To ensure that PHP is working correctly with your web server (Apache or Nginx), create a test PHP file.
For Apache:
Create a PHP file in the web root directory (e.g., /var/www/html):
echo "<?php phpinfo(); ?>" | sudo tee /var/www/html/info.phpRestart Apache:
sudo systemctl restart apache2Open your web browser and navigate to http://your-server-ip/info.php.
For Nginx:
Create a PHP file in the web root directory (e.g., /var/www/html):
echo "<?php phpinfo(); ?>" | sudo tee /var/www/html/info.phpEnsure that your Nginx server block is configured to use PHP. The configuration should include:
server {
    listen 80;
    server_name your_server_ip;

    root /var/www/html;
    index index.php index.html;

    location / {
        try_files $uri $uri/ =404;
    }

    location ~ \.php$ {
        include snippets/fastcgi-php.conf;
        fastcgi_pass unix:/var/run/php/php8.3-fpm.sock;
    }

    location ~ /\.ht {
        deny all;
    }
}
Restart Nginx:
sudo systemctl restart nginxOpen your web browser and navigate to http://your-server-ip/info.php.
Conclusion
Congratulations! You’ve successfully installed PHP 8.3 on your Debian 12 system. You can now begin developing or hosting PHP-based applications on your server. Regularly check for updates and security patches to keep your server secure.