ProjectSend is a flexible, web-based, free and open source client file sharing platform written in the PHP programming language. The advantage of the platform is that it is a self-hosted application that can be deployed in your own Linux environment with Apache web servers, PHP programming language interpreter and MariaDB database management system (also known as LAMP stack)
ProjectSend can detect the differences between file versions, there is no storage limit for the accounts unless you set up a quota, and the files can be uploaded and accessed through any browser.
This tutorial explains how to install and configure the latest version of the ProjectSend application on a Debian 9 server to set up a private and secure self-hosted file-sharing client that allows internal users of your organization to upload files online.
Requirements
- Debian 9 operating system installed on a physical server or a virtual machine (VPS)
- sudo root privileges for a local or remote account, or direct access to the root account
- A static IP address configured for one of your system’s network cards
- A publicly registered domain name or subdomain if the application is enabled for Internet access, or a private domain or subdomain configured in your internal DNS server. However, the application can also be served by the IP address of your server.
- To use the application’s email notifications, you should set up a mail server at your house or use the mail services of a public mail server like Yahoo! or Gmail.
Prerequisites
After installing the Debian 9 Linux distribution with minimal software footprint on your machine, first log into the server console and update your system repositories, software packages, and kernel with the following commands.
apt update
apt upgrade
After the upgrade process is complete, set up the name of your host by running the following command. Replace the hostname variable used in this example with your own system name. In this tutorial, we will use www as the hostname and www.myfiles.com as the fully qualified domain name (FQDN).
hostnamectl set-hostname www.myfiles.com
To check the hostname of the machine and the hosts file of your system, enter the following commands.
hostnamectl
cat /etc/hostname
hostname –s
hostname –f
In the last step of this part, you need to restart the Debian server so that the kernel updates and hostname changes are applied correctly.
systemctl reboot
As described in the tutorial description, the ProjectSend application is written in the PHP server-side programming language and is installed on a Debian server on a LAMP software package. The components that make up the LAMP stack are mainly a web server such as the Apache HTTP Server, a PHP Processing Gateway, and the RDBMS MySQL Daemon as the database backend. We start by installing and securing the first component of the LAMP stack: MariaDB database system.
The ProjectSend web software requires a MySQL database backend to store application configurations, user accounts, uploaded file locations, client specifications and other required data. In this tutorial, we will configure the web application to use the MariaDB database as a backend. To install the MariaDB database server and client on Debian 9, run the following command in the console with root privileges
apt install mariadb-server mariadb-client
The Mariadb database service should start automatically after installation. To verify that the daemon is actually running and waiting for incoming network connections at socket 127.0.0.1:3306, run the ss or netstat command and filter the command output using the grep utility.
ss –tlpn | grep mysql
or
netstat –tlpn | grep mysql
If the netstat utility is not present in Debian, install the net-tools package with the following command.
apt install net-tools
In the next step, secure MariaDB by running the script mysql_secure_installation. As you run the script, the console prompt will display a series of questions about securing the MariaDB database, such as: Change MySQL root password, remove anonymous users, disable remote root logins and delete the test database. You should enter Yes to all questions to fully back up the MySQL database daemon. Take the following excerpt from the script as a guide.
mysql_secure_installation
NOTE: THE EXECUTION OF ALL PARTS OF THIS SCRIPT WILL BE FOR ALL MariaDB
SERVERS IN PRODUCTION! PLEASE READ EACH STEP CAREFULLY!
To log into MariaDB to back it up, we need the current
password for the root user.
If you just installed MariaDB and
haven’t set the root password yet, the password is blank,
then you should just hit enter here.
Enter the current password for root (Enter for none):
OK, password used successfully, let’s move on….
Setting the root password ensures that no one can log in to the MariaDB
root user without proper authorization.
You already have a root password set, so you can safely answer ‘n’.
Change the root password? [Y/n] y
New password:
Enter new password:
Password updated successfully!
Reload permission tables…
… Success!
By default, a MariaDB installation has an anonymous user that anyone
can use to log in to MariaDB without having to create a user account for
them.
This is for testing purposes only and is intended to make the installation
a little smoother.
You should remove it before moving to a
production environment.
Remove anonymous users? [Y/n] y
… Success!
Normally, root should only be allowed to connect from ‘localhost’. This
ensures that someone cannot guess the root password from the network.
Disallow root login remotely? [Y/n] y
… Success!
By default, MariaDB ships with a database called ‘test’ that everyone
has access to.
This database is also for testing only and should
be removed before you deploy it in a production environment.
Remove the test database and access to it? [Y/n] y
– Delete test database…
… Success!
– Remove test database permissions…
… Success!
Restoring the permissions tables ensures that all changes made so far
take effect immediately.
Restoring the permissions tables now? [Y/n] y
… Success!
Clean up…
All done! If you have done all the above steps, your MariaDB
installation should now be safe.
Thank you for using MariaDB!
Next, log into the MySQL database console and secure the MariaDB root account plugin by entering the following commands
mysql -h localhost
Welcome to the MariaDB monitor. Commands end with ; or \g.
Your MariaDB connection identifier is 2
Server version: 10.1.26-MariaDB-0+deb9u1 Debian 9.1
Copyright (c) 2000, 2017, Oracle, MariaDB Corporation Ab and others.
Type ‘help;’ or ‘\h’ for help. Type ‘\c’ to clear the current input statement.
MariaDB [(none)]> use mysql;
Read table information to complete table and column names
You can turn this feature off with -A
database modified
to get a faster startup.
MariaDB [mysql]> update user set plugin=” where user=’root’;
Query OK, 1 row affected (0.00 sec)
rows matched: 1 Modified: 1 Warnings: 0
MariaDB [mysql]> flush privileges;
Query OK, 0 rows affected (0.00 sec)
MariaDB [mysql]> exit
Bye
Finally, test the security of the MariaDB database by trying to log in to the database from the console without a root password. Access to the database should be denied if no password is specified for the root account, as shown in the following command excerpt:
mysql -h localhost -u root
ERROR 1045 (28000): Access denied for user 'root'@'localhost' (with password: NO)
Next, try to log in to the database console using the root account and specify the root password using the -p option. You should be able to log in to the MySQL console as shown in the command example:
mysql -h localhost -u root -p
Enter password:
Welcome to the MariaDB monitor. Commands end with ; or \g.
Your MariaDB connection id is 15
Server version: 10.1.26-MariaDB-0+deb9u1 Debian 9.1
Copyright (c) 2000, 2017, Oracle, MariaDB Corporation Ab and others.
Type ‘help;’ or ‘\h’ for help. Type ‘\c’ to delete the current input statement.
MariaDB [(none)]> exit
Bye
In the next part, we will install and configure the other parts of the LAMP software stack: Apache HTTP server and PHP programming language interpreter. To install Apache and the PHP interpreter, as well as all PHP extensions and modules required to run the ProjectSend application in Debian, enter the following command in your server console
apt install apache2 libapache2-mod-php7.0 php7.0 php7.0-gd php7.0-opcache php7.0-zip php7.0-mysql
To list whether all installed PHP modules are enabled for the Apache web server, run the following command
php –m
After Apache and PHP are installed, verify that the web server is listening for incoming network connections on port 80 by running one of the following commands with root privileges.
netstat –tlpn| grep 80
ss- tulpn| grep 80
Finally, you open a browser on a remote desktop machine and navigate to your server IP address or domain name using the HTTP protocol to visit the default web page. You can determine the server IP address of your server using the ifconfig or ip a commands.
http://your_domain.tld
You can find out the external or public IP address of your server with the following command if you want to visit the application over the Internet
wget -qO- http://ipecho.net/plain ; echo
If you have a firewall enabled in your system that blocks incoming connections to port 80/TCP, such as the UFW firewall application, you should add a rule to allow HTTP traffic through the firewall by running the following command.
ufw allow WWW
or
ufw allow 80/tcp
The iptables raw rules you need to add to your Debian server to allow incoming traffic over port 80 on the firewall, so you can make the application accessible to external clients, are described below. Add a rule to allow SSH traffic past the firewall if you are remotely connected to the server
apt-get install -y iptables-persistent
iptables -I INPUT -p tcp --destination-port 80 -j ACCEPT
iptables -I INPUT -p tcp --destination-port 22 -j ACCEPT
netfilter-persistent save
systemctl restart netfilter-persistent
systemctl enable netfilter-persistent.service
In the next step, modify the PHP default configuration file to ensure that the following PHP variables are enabled on your server. First, save the PHP configuration file, then open the /etc/php/7.0/apache2/php.ini file to edit it and make sure the following lines are set up.
cp /etc/php/7.0/apache2/php.ini{,.backup}nano /etc/php/7.0/apache2/php.ini
Find, edit, and change the following variables in the php.ini configuration file:
file_uploads = On
max_execution_time = 60
memory_limit = 128
max_execution_time = 60
date.timezone = Europe/London
upload_max_filesize = 200M
post_max_size = 200M
Increase the upload_max_file_size and post_max_size variables to support large file attachments for your customers. Also, make sure you replace the date.timezone variable according to your server’s geographical time. You can find the list of PHP timezones in the PHP Docs at the following link http://php.net/manual/en/timezones.php
Also, you should enable the OPCache plugin available for PHP7 to increase the loading speed of your application pages. To enable the OPCache extension, add the following lines of code to the end of the PHP interpreter configuration file, below the [opcache] statement, as described below:
[opcache]
opcache.enable=1
opcache.enable_cli=1
opcache.interned_strings_buffer=8
opcache.max_accelerated_files=10000
opcache.memory_consumption=128
opcache.save_comments=1
opcache.revalidate_freq=1
Finally, close the php.ini configuration file and run the following command to verify that the OPCache variables were correctly inserted into the file.
grep opcache /etc/php/7.0/apache2/php.ini
The next step is to enable the Apache Rewrite Module to allow the use of the .htaccess file within the webroot domain by entering the following command.
a2enmod rewrite
To install and access the ProjectDend application using the HTTPS protocol, which secures traffic between the server and web browser clients, enter the following command to enable the Apache HTTP server’s SSL module and SSL site configuration file.
a2enmod ssl
a2ensite default-ssl.conf
Next, open the Apache default SSL site configuration file with a text editor and add the following URL rewrite rules after the DocumentRoot directive, as shown in the following example:
nano /etc/apache2/sites-enabled/default-ssl.conf
Extract from SSL site configuration file:
<Directory /var/www/html>
  Options +FollowSymlinks
  AllowOverride All
  Require all granted
</Directory>
Close the SSL Apache file and open the /etc/apache2/sites-enabled/000-default.conf file to edit it and insert the same URL rewrite rules after the DocumentRoot statement, as shown in the following example.
<Directory /var/www/html>
  Options +FollowSymlinks
  AllowOverride All
  Require all granted
</Directory>
Finally, restart the Apache daemon to apply all configured rules by entering the following command
systemctl restart apache2
Now you should call your domain name or server IP address using the HTTPS protocol. Since you are using the self-signed certificate pairs automatically issued by Apache during installation (which are not trusted by the browser), you should see an error warning in the browser.
https://yourdomain.tld
Accept the warning to bypass the untrusted certificate and continue to be redirected to the default Apache website. To avoid seeing these certificate warnings in client browsers, you should purchase a certificate issued by a trusted certificate authority or set Apache to use a free certificate pair issued by Let’s Encrypt CA.
If the UFW firewall application blocks incoming network connections to the HTTPS port, you should add a new rule to allow HTTPS traffic through the firewall by entering the following command.
ufw allow ‘HTTPS’
or
ufw allow 443/tcp
If iptables is the default firewall application installed to protect your Debian system at the network level, add the following rule to allow incoming traffic through port 443 in the firewall to allow clients to browse your domain name.
iptables -I INPUT -p tcp --destination-port 443 -j ACCEPT
netfilter-persistent save
systemctl restart netfilter-persistent
Finally, create a PHP info file in your domain webroot to verify the PHP configuration on your server by running the following command
echo '<?php phpinfo(); ?>'| tee /var/www/html/info.php
Visit the PHP info script file from a browser at the following URL – look at the PHP configurations and scroll down to the date setting to check the PHP time zone configuration.
Installing ProjectSend
Before you start downloading and deploying the application to your server, first run the following command to install some necessary utilities, such as zip and unzip archive packages, and wget and curl (web content downloaders, among others). These utilities are used for downloading and extracting the application’s source files from the command line.
apt install wget zip unzip curl
After meeting all the system requirements for installing the application, visit the official ProjectSend download page at https://www.projectsend.org/#download and download the latest compressed zip archive into your system using the curl utility, as shown in the following command example.
curl https://www.projectsend.org/download/140/ --output projectsend.zip
After the zip archive download is complete, unzip the zip archive file to your current working directory and list the unzipped files with the following commands.
unzip projectsend.zip
ls
Next, delete the default index.html file installed by the Apache web server into the webroot path and the info.php script file created earlier to check the PHP configuration by entering the following commands.
rm /var/www/html/index.html
rm /var/www/html/info.php
The ProjectSend installation files are located in your current working directory in the ProjectSend-r754/ directory. The directory name should be different if you download a different version of the software. Enter the command ls to list the files in this directory. Copy the entire contents of the unzipped directory to the root of your web server by running the following command. Also, make sure you copy the hidden .htaccess file to the webroot path.
ls ProjectSend-r754/
cp -rf ProjectSend-r754/* /var/www/html/
cp ProjectSend-r754/.htaccess /var/www/html/
Next, make sure the Apache runtime user owns the application files installed in your domain’s webroot path and has full write permissions to the webroot path. Use the ls command to list the permissions for the application’s installed files in the /var/www/html/ directory.
chown -R www-data:www-data /var/www/html/
ls –al /var/www/html/
Before you start installing the application via the web interface, log into the MariaDB database console and create a new database with a user and a secure password. The database user will be used to manage the ProjectSend database. Run the following command to create the database and credentials, and be sure to replace the database name, user, and password used in this tutorial with your own settings.
mysql –u root -p
Welcome to the MariaDB monitor. Commands end with ; or \g.
Your MariaDB connection identifier is 2
Server version: 10.1.26-MariaDB-0+deb9u1 Debian 9.1
Copyright (c) 2000, 2017, Oracle, MariaDB Corporation Ab and others.
Type ‘help;’ or ‘\h’ for help. Type ‘\c’ to clear the current input statement.
MariaDB [(none)]> create database projectsend_db;
Query OK, 1 line affected (0.00 sec)
MariaDB [(none)]> grant all privileges on projectsend_db.* to ‘projectsend_user’@’localhost’ identified by ‘password1234’;
Query OK, 0 rows affected (0.00 sec)
MariaDB [(none)]> flush privileges;
Query OK, 0 rows affected (0.00 sec)
MariaDB [(none)]> exit
Bye
Let’s now start installing the ProjectSent application in your domain. First, open a browser and securely navigate to your server’s IP address or domain name using the HTTPS protocol.
https://yourdomain.tld
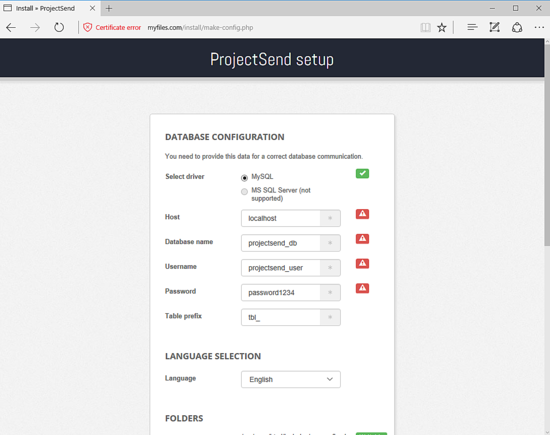
In the first installation script you set up the database connection configuration. Select the MySQL driver and specify the hostname of the ProjectSend database (use localhost or 127.0.0.1), the database name and the previously configured credentials. Also make sure you specify a prefix name for the database table. Next, select the application language and scroll down to continue with the setup.
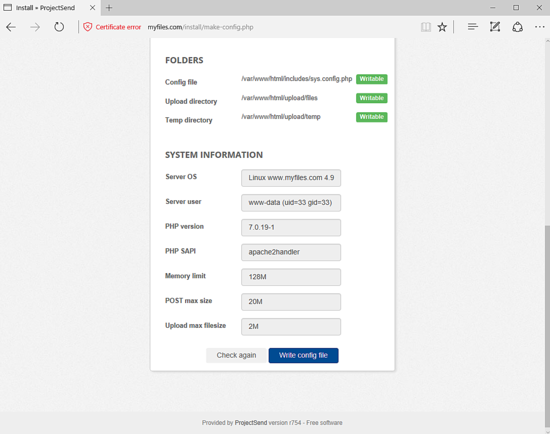
In the next step, the installer checks if the application configuration file and the upload directory have sufficient permissions to allow the Apache runtime user to write to these directories. If the permissions are present, a green label will tell you that the permissions are set correctly. The installer will also display your system information and some PHP environment configurations. If everything is configured correctly, click the Write Configuration File button to apply all the settings and move to the next step of the installation process.
After the application configuration file has been successfully written, click the Continue to Install button to proceed to the next screen.

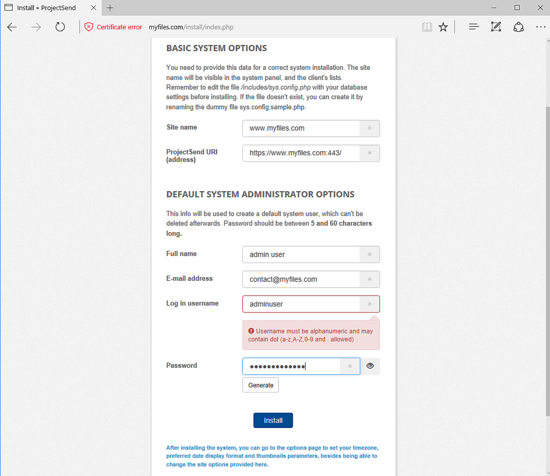
On the next screen, verify that your website name and URL address are recognized correctly, add the administrator account information (full name, email address, and username), and choose a secure password for the administrator. Finally, click the Install button to start the installation process.
After the installation process is complete, the installer will inform you that the application is now running. Click the Log In link to authenticate with the application using the credentials of the administrator account you created during the installation process.
.

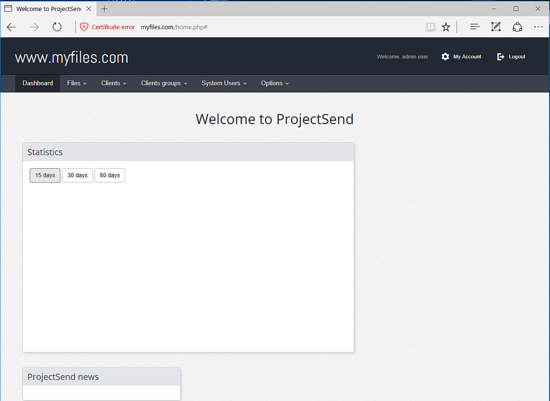
After logging in to the application using the admin credentials, you will be redirected to the ProjectSend Dashboard from where you can start managing the application.

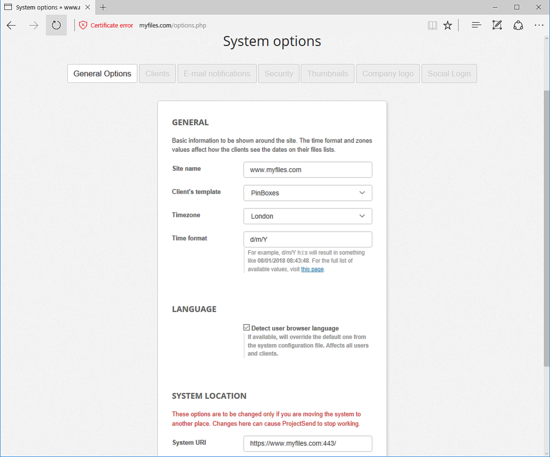
On the dashboard, click the top Options menu, go to General Options, and update the application page title, client template, time zone, time format, language, and URI location, as shown in the following image.
To force clients to securely browse the ProjectSend application using the HTTPS protocol, go back to your server’s console and edit the .htaccess file in the /var/www/html/ directory by entering the following command
nano /var/www/html/.htaccess
Add the following rules to the .htaccess file before the </IfModule> closing tag to force domain traffic to HTTPS.
# Redirect to HTTPS
RewriteEngine On
RewriteCond %{HTTPS} off
RewriteRule (.*) https://%{SERVER_NAME}/$1 [R,L]
</IfModule>
Also, turn off directory indexing and protect the installation directory by adding the following rules to the .htaccess file
RedirectMatch 404 ^/install/.*$
Options -Indexes
You also have the option to change some PHP server settings, such as increasing the file upload size for the application.
.htaccess Excerpt from the file:
# Change PHP settings
php_value upload_max_filesize 400M
php_value post_max_size 400M
Congratulations! You have successfully deployed the ProjectSend application in Debian 9
; You can find the ProjectSend application documentation pages at the following address: https://www.projectsend.org/category/tutorials/