When it comes to complex scientific calculations, Anaconda is the first name that comes to your mind. It is a distribution of the Python and R programming languages designed specifically for scientific calculations. Moreover, Anaconda simplifies package management and deployment, thus reducing the burden on users to a great extent.
When we talk about Anaconda’s packages, you’ll be amazed to know that it includes data science packages not only for Linux but also for macOS and Windows. This capability of Anaconda makes it a cross-platform and highly flexible distribution. Anaconda was launched in 2012 and is written in Python.
The Anaconda Python distribution comes in a mini edition and an individual edition, both of which are free. However, there is a special pricing plan for the other editions. It also provides you with a graphical user interface, Anaconda Navigator, making the distribution even more convenient.
We can install Anaconda on any Linux distribution, but the following article focuses on installing it on an Ubuntu 22.04 system.
Installing Anaconda on Ubuntu
If you want to install Anaconda on an Ubuntu 22.04 machine quickly, you should carefully follow the step-by-step procedure described below:
Step #1: Update Ubuntu
Although we want to install Anaconda on our system, we will first update our system using the following command:
$ sudo apt update
![]()
Step # 2: Install the “curl” command on your system
After you have updated your system, you will need to install the “curl” command on your system using the command attached below. If you have already installed the command on your system, you can skip this step and proceed directly to step 3.
$ sudo apt install curl
![]()
![]()
Step #3: Download the latest version of Anaconda to your system
After installing the “curl” command, we need to download the latest version of Anaconda to our Ubuntu 20.04 system. However, before that, we need to navigate to the “tmp” directory of our system by running the following command:
$ cd /tmp/
![]()
![]()
Once you are in the “tmp” directory of your system (you can easily see the changed path in the following image), you need to run the following command to download the latest version of Anaconda to your Ubuntu system:
$ curl https://repo.anaconda.com/archive/Anaconda3-2023.09-0-Linux-x86_64.sh --output anaconda.sh
Once this command is executed, you can see an output similar to the one in the following image on your terminal:

Step # 4: Check the integrity of the downloaded file on your system
When you install large files from the Internet, there is a very high chance that they will get corrupted. Therefore, before proceeding further, you need to verify the integrity of the recently downloaded Anaconda file on your Ubuntu system using the command below:
$ sha256sum anaconda.sh
![]()
![]()
When you run this command, you will see the checksum of your downloaded Anaconda file, as shown in the picture below. You can compare it with the checksum available for your specific Anaconda version on the official Anaconda website. If both checksums match, it means that the integrity of your downloaded Anaconda file was not compromised during the download process.

Step #5: Install the Anaconda packages on your system
After verifying the integrity of your downloaded Anaconda file, you can install all the required packages using the command below:
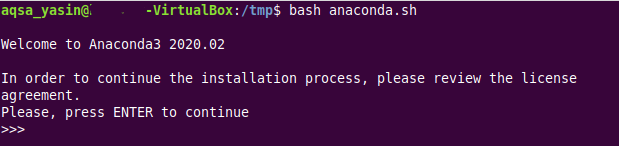
$ bash anaconda.sh
![]()
![]()
After some time of running this command, you will be prompted to press Enter to continue the installation, as shown in the following image:
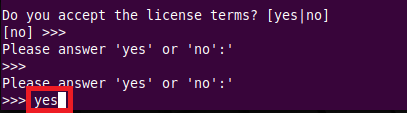
Then, you will see the license agreement of Anaconda on your terminal. You can keep pressing Enter until the license agreement is complete, and then you will be prompted to type “Yes” to continue. This is highlighted in the image below:
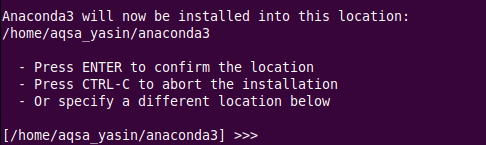
You will then be prompted to choose a location to install Anaconda on your Ubuntu system. We chose the default location by pressing Enter, as shown in the figure below:
The installation of Anaconda now officially begins and is completed after about 10 to 15 minutes, depending on your internet speed.
Step #6: Activate Anaconda installation on your system
Once Anaconda is installed on your Ubuntu system, you can activate the installation using the command below to use it.
$ source ~/.bashrc
![]()
![]()
Step #7: Confirm Anaconda installation on your system
This is an optional step that you can use to confirm whether Anaconda has been successfully installed on your Ubuntu system or not. All you have to do is run the following command in your terminal:
$ conda info
![]()
![]()
If Anaconda was successfully installed on your system, you will see all the relevant information about Anaconda in your terminal.
Conclusion
In this article, we have taken you through installing Anaconda on an Ubuntu system. The entire process will take about half an hour. We understand this is a bit too long, but since the Anaconda package is very large because it consists of several different packages, it just takes time to install it on your system. However, if you follow the entire process described in this article, you will find it extremely helpful. You can install Anaconda on your Ubuntu system without any problems.