
Apache Cassandra is an open-source NoSQL database management system. It is designed to handle large amounts of data across many servers and to survive the loss of any server.
Cassandra’s architectural model is quite different from relational database systems. Cassandra stores non-relational data in row key-value pairs in a distributed set of nodes so that no single point of failure exists and scales linearly by adding more nodes as necessary to meet the demands on capacity, request throughput, and storage capacity for an increasing number of users or client applications.
Cassandra uses a peer-to-peer architecture, with every node potentially acting as a server and client simultaneously. As part of this architecture, Cassandra automatically balances data across all nodes in the cluster without requiring users to pre-split the database or manually move records. Data striping may be used to increase parallelism while maintaining throughput during writes. HTTP/REST interface lets clients communicate directly with Cassandra without the use of a SQL layer, although a CQL layer is available.
The Cassandra Query Language (CQL) is an extension of the Structured Query Language. Unlike SQL, CQL has no support for joins or subselects. In exchange, CQL can automatically name columns with composite keys and track changes to records over time.
Unlike most other NoSQL databases, Cassandra is schema-free. This allows application developers to optimize reading speed over that of writing by omitting the overhead associated with stating what fields must be written at their time of creation.
In this guide, we will walk you through the steps necessary to set up a highly available deployment of Apache Cassandra on a Rocky Linux 8 x86_64 server. This guide will work on AlmaLinux 8 and CentOS 8 too.
Prerequisites
In order to install Cassandra, you will need to have a few things ready on your system. They are as follows:
- Root access or a non-root user account with sudo privileges.
- A RockyLinux 8, AlmaLinux 8, or CentOS 8 server with at least 2GB of memory and a minimum of 20GB of free disk space.
Updating the System
It’s always a good practice to keep your system updated. The following commands will update the packages on your server.
sudo yum update -y
Installing Java
You will need Java in order to run Cassandra. We will use the openjdk 8 package for this guide, but you can also install other Java packages if you prefer.
sudo yum install java-1.8.0-openjdk-devel -y
Once the package has been installed, you can check that Java is running by typing at the command prompt. If the output contains a version number for Java version 1.8 or greater, you have installed it successfully.
java -version
Sample output.

Adding Apache Cassandra Repository
You will need to add the Apache Cassandra repository to your system in order to download and install Cassandra.
First, create a new repository file named cassandra.repo in the /etc/yum.repos.d directory by typing the following command at your terminal prompt with your preferred editor. This guide uses nano as an example, but you may substitute it with your preferred editor.
sudo nano /etc/yum.repos.d/cassandra.repo
Now, populate the repository file with the following lines. After completing this, save your changes and exit the editor by pressing Ctrl+X followed by Y, then hit Enter. Here 311x mean version 3.11. If you want to install another version, replace the 3.11 with your desired version number.
[cassandra]

name=Apache Cassandra
baseurl=https://www.apache.org/dist/cassandra/redhat/311x/
gpgcheck=1
repo_gpgcheck=1
gpgkey=https://www.apache.org/dist/cassandra/KEYS
Now run the command below to populate your local yum cache. Accept any prompts that come up for this command.
sudo yum makecache
Sample output.

Installing Apache Cassandra
Now that you’ve set up the repository, you can proceed with installing Cassandra. The following command will download and install both Apache Cassandra and its dependencies on your server, saving us from having to manually install them ourselves.
This method is the preferred method for installation in most cases because it saves you from having to manually track dependencies and resolve package conflicts.
sudo yum install cassandra -y
Once the installation is complete, you can start Cassandra by typing the following command at your terminal prompt. We will use SystemV init to start Cassandra on RockyLinux 8.
sudo service cassandra start
Sample output.

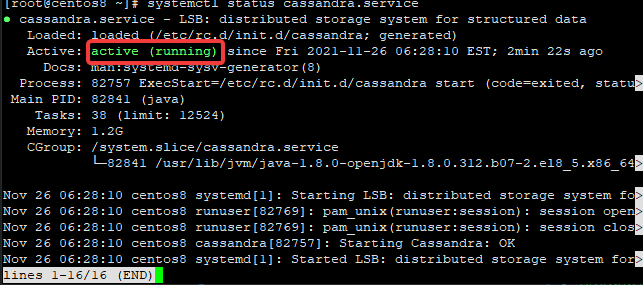
To check its status, run the following command.
systemctl status cassandra.service
You will get an output similar to the one below.
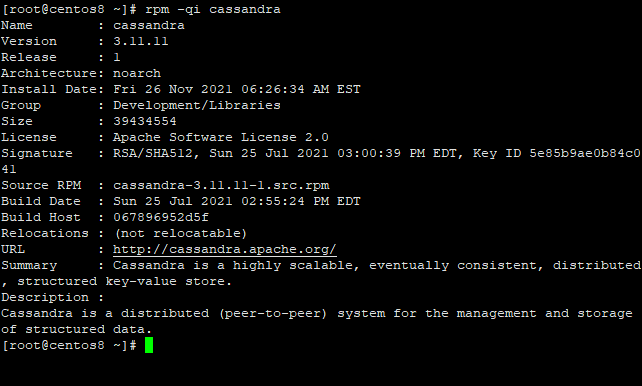
You can also run the command below to get more information about the installed version of Apache Cassandra.
rpm -qi cassandra
Sample output:
Configuring Apache Cassandra
Now that you’ve installed Apache Cassandra, you need to configure it. We will do this by editing the cassandra configuration file located at /etc/cassandra/default.conf/cassandra.yaml
First, you must create a backup of the default.conf file in case we make any mistakes while editing it. To do this, run the following command at your terminal prompt:
cd /etc/cassandra/conf/ && cp cassandra.yaml cassandra.yaml.bkp
Now, open the file for editing with your preferred editor. This guide will use nano as an example, but you are free to substitute it for your preferred editor.
sudo nano /etc/cassandra/conf/cassandra.yaml
Now, let’s update the following lines of the configuration file. Configurations values are provided below each line for a quick reference.
Before:

After:

Remember to save and exit the configuration file. When you’ve finished editing, run the following command to start Apache Cassandra:
sudo systemctl restart Cassandra
Testing the Installation
Now that you’ve installed Apache Cassandra, let’s test it to make sure everything is working correctly. To do this, we will connect a client to the server and issue a few commands to individual nodes.
First, run the command below to connect the Cassandra cluster. This command will create a new cqlsh session and output some information about Cassandra on your system. We will use the default username/password cassandra to connect to the Cassandra server.
cqlsh -u cassandra -p cassandra
Sample output:

Now, let’s change the default cluster name to OSNote Cluster. You can do this by using the following command. Replace OSNote Cluster with your preferred cluster name.
UPDATE system.local SET cluster_name = 'OSNote Cluster' WHERE KEY = 'local';
Once you’ve entered the command, your cluster name will be changed. Now open the configuration file. You can see that the file is now updated with the new cluster name by looking at it with nano text editor.
sudo nano /etc/cassandra/default.conf/cassandra.yaml
That’s it! You’ve successfully installed Apache Cassandra on your Rocky Linux 8 server.
Conclusion
In this guide, we walked you through the steps necessary to install a highly available deployment of Apache Cassandra on a Rocky linux 8 x86_64 server. We’ve also provided sample output from the successful installation of Apache Cassandra.