Maven is the name of an automated build engine used primarily for Java projects. It is a free, open-source tool that greatly eases building and managing of other libraries or applications that are to be bundled as part of the project.
Maven takes care of details such as downloading dependencies, parsing information about those dependencies from the POM file ( pom.xml ), storing them in local repositories, resolving dependencies, compiling source code, packaging binaries, testing software quality, deploying it etc. which are all cumbersome tasks for developers.
The concept behind Maven is to follow convention over configuration. The idea is that if you configure things accordingly using best practices, then your build will be robust without doing anything special.
Although there are other similar tools available in the market right now, Maven has gained a lot of ground in the past few years because of its maturity and wide adoption. The Apache Maven project is now used by millions of developers around the world.
One of the reasons for this popularity is that it is based on principles that have been well tested in the field. For example, Maven’s central repository (repo1.maven.org) contains over 35,000 artifacts from over 2,500 projects! So if you’re looking for a library or dependency to include in your project, it’s likely that someone has already packaged it up and made it available through Maven. This greatly reduces the chances of reinventing the wheel.
In addition, many companies have started to endorse Maven. For example, Google has released Guice, which is a lightweight dependency injection framework that uses Maven to manage its dependencies. There are many other similar examples available in the wild.
But there are some drawbacks too.
Building projects with Maven is not easy if you’re completely new to it. If you try doing this for your first project, chances are you’ll find yourself staring at the screen for hours trying to figure out why things aren’t working out as you expected them to be.
The documentation can also be a little confusing at times, and the sheer number of options can be overwhelming.
Nevertheless, with a little effort, you’ll be able to get over these hurdles and start leveraging all the benefits that Maven has to offer. So if you’re not using it already, it’s time to give it a try!
You will learn how to install Apache Maven on AlmaLinux 8, as well as how to create your first simple Maven project.
Prerequisites
In order to follow along with this article, you’ll need the following:
- An AlmaLinux 8 or Rocky Linux 8 machine
- A text editor of your choice
- Root privileges (or sudo privileges)
Installing OpenJDK 11
We’ll install OpenJDK 11, which is the Java development kit required to run Maven. OpenJDK is an open-source implementation of the Java Development Kit.
You might ask why we use OpenJDK when there are other Java development kits available in the market. The answer is that OpenJDK is free, it’s open source, and it’s under active development. It also has a very large user base, so you’re likely to find help and support for it if you need it.
On AlmaLinux 8, OpenJDK 11 is included in the default repositories. So all you need to do is type the following command in a terminal.
sudo dnf install java-11-openjdk-devel -y
Once the installation is complete, we’ll verify that OpenJDK 11 is installed correctly by typing the following command.
java -version
This is what the output should look like.

Installing Apache Maven on AlmaLinux 8
Now that we’ve installed OpenJDK 11 on AlmaLinux 8, we can install Maven itself.
We’ll use wget to get the official Maven package from the main maven repositories maintained by Apache. Simply type the following command in a terminal window.
wget https://dlcdn.apache.org/maven/maven-3/3.8.4/binaries/apache-maven-3.8.4-bin.tar.gz
This wget command downloads the latest version of Apache Maven from the official Apache Maven website. The package is saved to the current directory, so you’ll need to extract it using the tar command.
sudo tar -xvf apache-maven-3.8.4-bin.tar.gz -C /opt
The extracted files will be placed in the /opt/apache-maven-3.8.4 directory. We’ll create a symbolic link to this directory so that we can easily access it from anywhere on our system.
sudo ln -s /opt/apache-maven-3.8.4 /opt/maven
ln -s (symbolic link) creates a pointer from one file or directory to another. In this case, we’re creating a symbolic link from the apache-maven-3.8.4 directory to the maven directory.
Next, we will need to set the MAVEN_HOME environment variable so that Maven knows where to find its installation directory.
Run the command below to create a new file called maven.sh in the /etc/profile.d directory. nano is a simple text editor that you can use to create or edit files.
sudo nano /etc/profile.d/maven.sh
In this file, we’ll set the MAVEN_HOME environment variable to the /opt/maven directory.
# A Java environment variable that tells Maven where to find the Java Development # Kit on your system.

export JAVA_HOME=/usr/lib/jvm/jre-openjdk

# Set the MAVEN_HOME environment variable to the /opt/maven directory.

export M2_HOME=/opt/maven

# Tells Maven where to find the Maven installation directory.

export MAVEN_HOME=/opt/maven

# Set the PATH environment variable to the /opt/maven/bin directory and the default # path.

export PATH=${M2_HOME}/bin:${PATH}
This file will be executed every time you log in to your system, so Maven will be automatically set up and ready to use.
Next, run the command below to give the maven.sh file execute permissions so that it can be run as a program.
sudo chmod +x /etc/profile.d/maven.sh
Next, run the source command to load the maven.sh file into your current shell session.
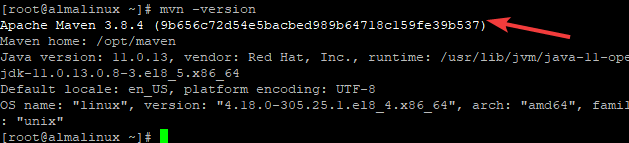
Before we start writing our first Maven project, let’s verify that Maven is installed correctly by running the following command.
mvn -version
The mvn command is the Maven executable. The -version switch tells Maven to print its version information.
If everything is installed correctly, you should see an output similar to the following.
Creating a Maven Project
Now that you’ve set up Maven, we’ll create our first Maven project.
First, you should create a new directory for your Maven project using the mkdir command. This mkdir command creates a new subdirectory called maven-example in the current working directory. This is where we’ll create our Java project
cd && mkdir maven-example && cd maven-example
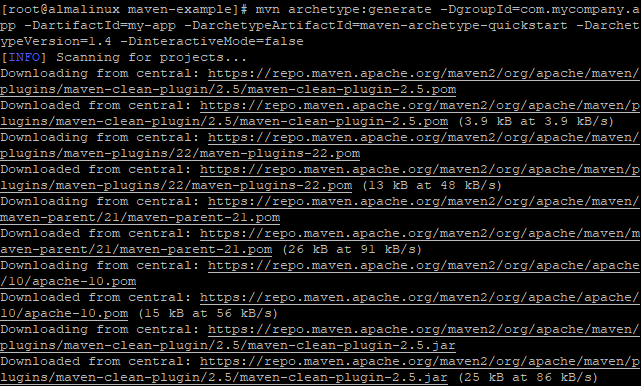
Once you are inside the maven-example directory, run the following Maven command to initialize your new project.
mvn archetype:generate -DgroupId=com.mycompany.app -DartifactId=my-app -DarchetypeArtifactId=maven-archetype-quickstart -DarchetypeVersion=1.4 -DinteractiveMode=false
mvn is the executable to run Maven commands.
- archetype:generate is the goal to generate a project from an archetype.
- -DgroupId=com.mycompany.app : specifies the group identifier for your application, which is typically the company or organization name
- -DartifactId=my-app : specifies the application’s unique identifier, which is typically a lowercase word with no spaces. This will be used to identify the application in Maven repositories
- -DarchetypeArtifactId=maven-archetype-quickstart : specifies the artifact identifier for Maven’s Archetype quickstart archetype, which is a starter project for your new application
- -DarchetypeVersion=1.4 : specifies the archetype version to use
- -DinteractiveMode=false : tells Maven not to prompt you for any input
Sample output:
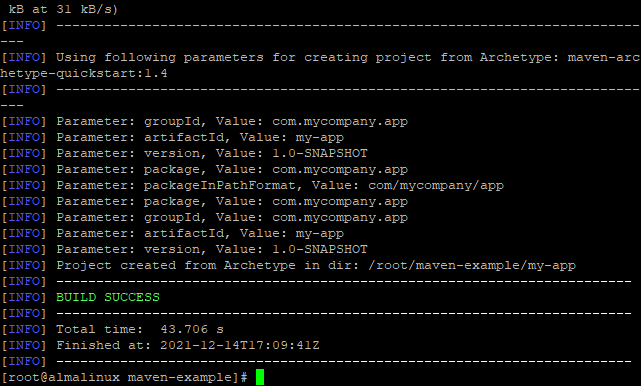
Your new project will be generated in the my-app directory. Change into the my-app directory and run any goal on the archetype that you like.
cd my-app
Run the tree -a command to list all of the directories and sub-directories in your current directory. You will notice the following standard project structure.
tree -a
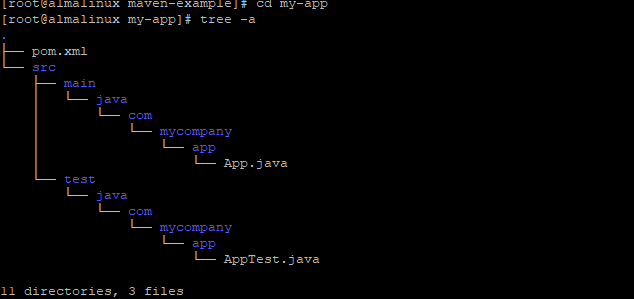
The pom.xml file is the project’s build file. The src directory contains the source files for your application. The main directory contains the Java source files for your application’s main class, which is located in the com/mycompany/app/App.java file. The test directory contains the source files for your application’s test class, which is located in the com/mycompany/app/AppTest.java file.
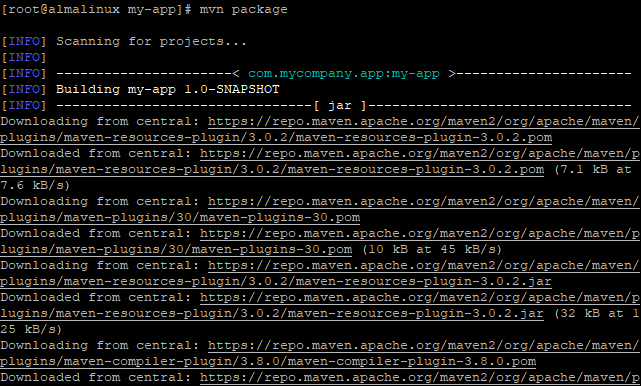
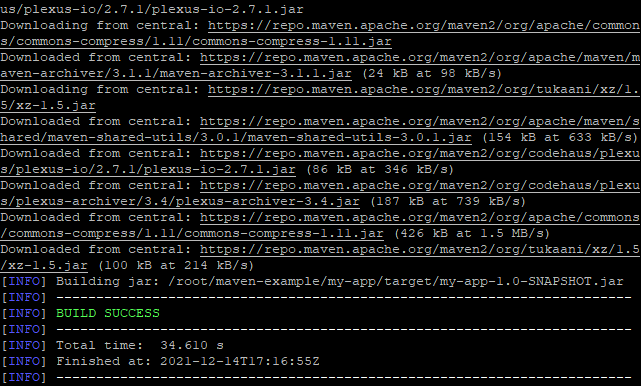
Now, run the command below to create a JAR file of your application.
mvn package
This will create a my-app-1.0.jar file at the base of your project directory.
Sample output:
Next, run the java -cp target/my-app-1.0-SNAPSHOT.jar com.mycompany.app.App class to run your application.java -cp target/my-app-1.0-SNAPSHOT.jar com.mycompany.app.App
java -cp target/my-app-1.0-SNAPSHOT.jar com.mycompany.app.App
The -cp switch tells Java which classpath to use when running the application. In this case, we’re telling Java to use the my-app-1.0-SNAPSHOT.jar file that we created in order to run our application.
If everything goes well, you should see the following output.
![]()
![]()
Conclusion
Maven is a build automation tool that allows you to easily manage and compile your Java projects. In this article, we’ve covered the basics of setting up Maven and creating a new project. We’ve also looked at how to create a JAR file of our application and run it. For more information on Maven, check out its official documentation.