Python is an interpreted, interactive, object-oriented programming language. It was created by Guido van Rossum in 1991.
Python runs on Windows, Linux/Unix, Mac OS. Python can be used to develop desktop GUI applications and CGI scripts for the web. Also, it’s used for server-side scripting for Apache HTTP Server sites. Python is most popular for its elegance and simplicity.
The major advantage of using Python is that there are very few keywords to learn and easy to understand. It’s a general-purpose programming language, which means it can be used in any field of software development with ease and adaptability.
Python syntax is minimal and very English-like. It’s self-describing, which means that the code itself explains what it does. For example, “print” in Python displays the text of a program. This leads to a faster development time because there are no compile errors.
Other languages need to be compiled before they can run. That makes sense when you want your program to run as fast as possible or if you want it to be small enough to fit on a machine with very limited memory. But for many kinds of programs, speed isn’t critical, especially when they are being used interactively or for prototyping or testing new programming ideas quickly. Python can help save some time by not having its source code compiled into machine-specific instructions.
A common question that many programmers have is how to install latest Python on Debian 11. This post will walk you through the steps of installing Python from source code.
Prerequisites
- A working Debian 11 installation with root access.
- We will need an internet connection, preferably through LAN (Ethernet) or WiFi, to download the necessary files.
- At least 2 GB of RAM is recommended for comfortable work.
Step 1. Updating the System
The first step is to update the system. Run this command to update your system:
sudo apt-get update
Next, we need to install the necessary packages. Run this command to install these packages.
sudo apt install wget build-essential libbz2-dev libncursesw5-dev -y
sudo apt install unzip libreadline-dev libssl-dev libsqlite3-dev -y
sudo apt install tk-dev libgdbm-dev libc6-dev libffi-dev zlib1g-dev -y
Step 2. Downloading the Python Source Code
The next step is to download the source code. You can download it from its official page.
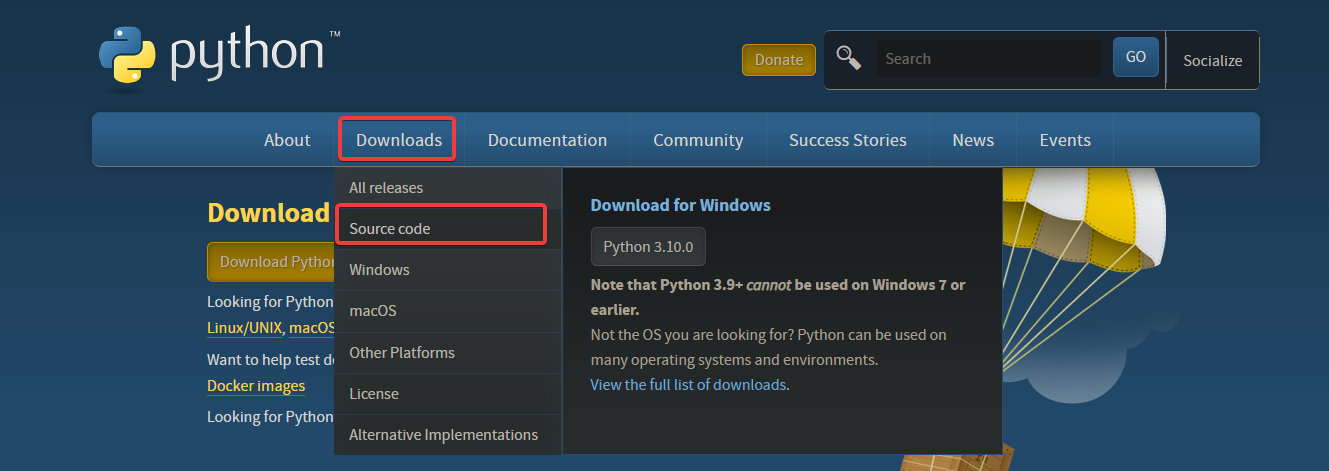
Open your web browser, navigate to:
https://www.python.org/downloads/
On the download page, click on the Download tab, and click on the Source code tab.
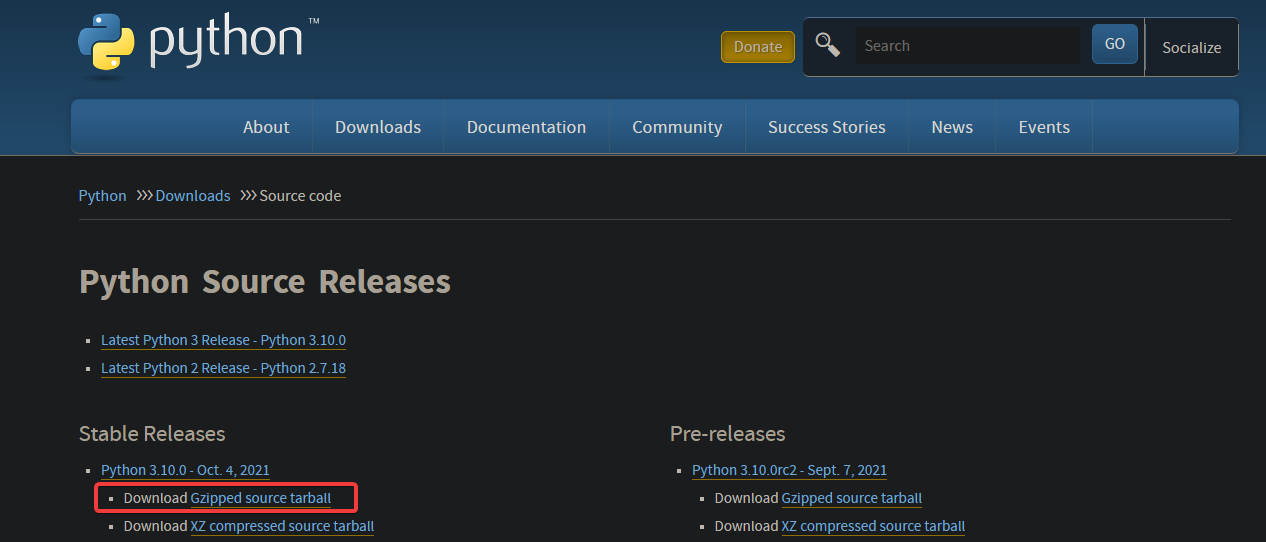
On the Python Source Releases page, find the latest stable release. At this time, it’s v3.10.0. This is the version we will download and install.
Hover over the Download Gzipped source tarball, right-click to copy the URL.
Once the URL is copied, return to your terminal. Make sure you’re in your home directory.
cd
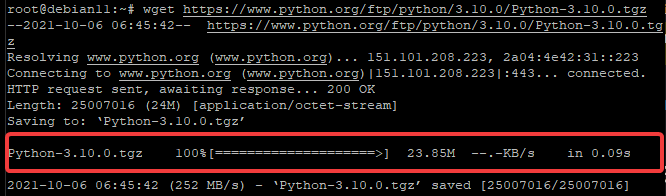
Now use the wget command to download the Python version we selected. Also, pass the URL that you copied earlier into this command like below.
wget https://www.python.org/ftp/python/3.10.0/Python-3.10.0.tgz
The wget command will display a download bar under the command line. Wait until the file has finished downloading. It will take a few minutes, depending on your internet connection speed.
At this point, you should have downloaded the archive file containing Python source code. You can list all files to check for this file.
ls
In the output, you should see a file called Python-3.10.0.tgz. This is the file we just downloaded from the Python website.
![]()
![]()
We will extract the zip file using the tar command.
tar xzf Python-3.10.0.tgz
At this point, we should have the source code in a new directory called Python-3.10.0. Let’s move inside and check it out.
cd Python-3.10.0
ls
Step 3. Installing Python
Now, we need to configure and make the installation. For this, run the following command:
./configure --enable-optimizations
After running this command, it will display “Configured …” in your terminal. You can scroll up and make sure you see that message before continuing to the next step. Make sure your internet connection is still active.
Now run the make command to start compiling the source code.
make -j4
The -j4 switch tells the make command to compile Python with four threads in parallel. If you have more cores, use this option multiplied by the number of cores you have for faster compilation time. For example, if you have eight cores, you should use this command:
make -j8
Once the Make command is finished running, run the following command to install Python. If you used the make command with the -j4 switch, it might take a few minutes to finish installing. Please be patient.
sudo make altinstall
The altinstall command instead of the install command would stop over writing your previous version of Python if you had any previously installed.
If everything went OK, you should have a brand new installation of Python 3.10. You should get an output like the below. Take a look at the right side of the terminal and confirm that it says Successfully installed …
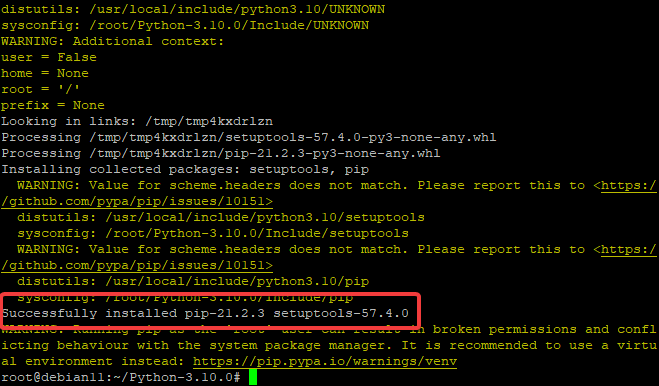
At this point, Python has been successfully installed to the /usr/local/bin. You can check that by checking the version of Python to confirm that you have done it correctly.
python3 --version
Step 3. Testing the Python Installation
Now that we have Python successfully installed let’s create a simple Hello World program and run it.
sudo nano hello.py
The above command will open up the nano editor where we can write our Python code. Write the following code in your python file.
print("OSNote - Hello World!")Now save the file by pressing Ctrl+X. Press Y and Enter to confirm the filename to save it as hello.py.
Now let’s run the file by calling Python to interpret this file as an executable program.
python3 ./hello.py
You should get an output like “OSNote – Hello World!”
Conclusion
In this tutorial, we reviewed what Python is and why it’s so popular among developers. We also covered how to install the latest version of Python 3 on a Debian 11 system.
If you enjoyed this tutorial, please share it with your friends. You can also take a look at our other tutorials and guides for students and beginners.