Python is a programming language that was created with one goal in mind: to make it easy for anyone, not matter their skill level or experience as far as computer science goes. Developed over 30 years ago by Guido van Rossum and still evolving today under an ever-watchful eye (but never too much), this innovative system of codes allows users access tools they need without having any previous knowledge about how things work underneath them all – making success possible at every turn!
The rationale behind Python is that code readability is more important than anything else.
Python has many features that set it apart from other programming languages because of this philosophy. For example, Python has extensive support for object-oriented programming (OOP), while also being easy to learn for beginners. Additionally, Python has a large standard library that provides a wide variety of modules for performing tasks, which is supported by the language’s strong integration with C.
The language itself consists of a large standard library, consisting of modules (roughly equivalent to libraries in other languages), and an extensive core library. Many are available in package form for installation using the system package manager or the Python Package Manager.
Python interpreters are available for a number of operating systems, which means that you can write and run Python code on any platform.
And yet another amazing thing about this programming language is its ability to work with both server-side scripts (with the goal being increased efficiency) as well as individual end users who may want something customized just for them!
Python used the C language syntax that was popular at the time to make its code familiar to programmers of other languages; thus, Bill Joy has called Python “a great language for teaching because it is so much fun.”
Lisp-style programming is supported by Python’s design. It has filter(), map() and reduce() functions; list comprehensions, dictionaries, and sets; generators; coroutines; strings and Unicode as native data types; exception handling with a type hierarchy, as well as garbage collection. A large number of extensions have been written to augment the standard library. Various system calls and libraries are supported, along with a large number of bindings.
Python gets its name from the British comedy group Monty Python, whose Flying Circus aired in the early 1970s. The group’s title was a play on words, as it incorporated the name of the BBC show Doctor Who—which Monty Python member Terry Jones had worked on.
In this guide, we will walk you through the process of installing Python on Almalinux 8. We’ll also show you how to get started with the language, and teach you a few basic programming concepts by creating a basic Python program. Let’s get started!
Prerequisites
In order to install Python on Almalinux 8, you’ll need to be logged in as root. You’ll also need an Internet connection, since the installation process will download the necessary files from Python’s official website.
Python can be installed on Almalinux 8 using either the default repositories or the Python official software source. This guide will show you how to install it from both sources.
Installing Python Using DNF
The DNF package management tool is the default package manager on Almalinux 8. DNF stands for “Dandified Yum”, and is a fork of the older Yum package manager.
This is the easiest way to install Python 3 on Almalinux 8. But you might not the latest version of Python 3. The default repositories on Almalinux 8 are not always up-to-date.
First, run the command below to make sure your system is up-to-date.
sudo dnf update -y
Next, run the command below to install Python 3.9 with DNF. python39 is the specific version of Python you wish to install (in this case, 3.9).
sudo dnf install python39 -y
Once the installation is complete, run the command below to make sure Python 3 has been installed.
python3.9 --version
The output should look like this:

Installing Python from Source
If you want to install the latest version of Python 3, you will have to download it from Python’s official website and install it yourself. This section will show you how to install Python 3.90 from source code. You can replace 3.9 with any newer version of Python 3 you wish to install.
Due to its nature, Python source code is constantly being developed and updated.
There are two branches: main and legacy. The main branch is the official Python branch, and is typically the most up-to-date version of the language. The legacy branch is an older version which will not be receiving any future updates. Since we’re learning how to install Python 3, we will be using the main branch.
First, run the command below to install required dependencies.
sudo dnf groupinstall "Development Tools" -y
sudo dnf install bzip2-devel libffi-devel openssl-devel -y
groupinstall installs the required development tools named Development Tools which is a collection of packages that are often used when compiling software from the source code.
Next, run the gcc command to make sure gcc is properly installed. Gcc is a compiler that is used to compile source code into binary files.
gcc --version
If you see a version number after the command, then gcc is installed and ready to use. If not, re-run the sudo dnf groupinstall “Development Tools” -y command above to install it.
Sample output:

Next, run the wget command to download the Python 3.9 source code from the Python official website. wget is a tool used to download files from the internet.
wget https://www.python.org/ftp/python/3.9.7/Python-3.9.7.tar.xz
Next, run the tar command to extract the downloaded Python 3.9 source code.
tar xvf Python-3.9.7.tar.xz
Next, run the cd command to change into the source code directory that was created with the previous tar. cd is a tool that allows us to navigate (change directories) in Linux.
cd Python-3.9.7/
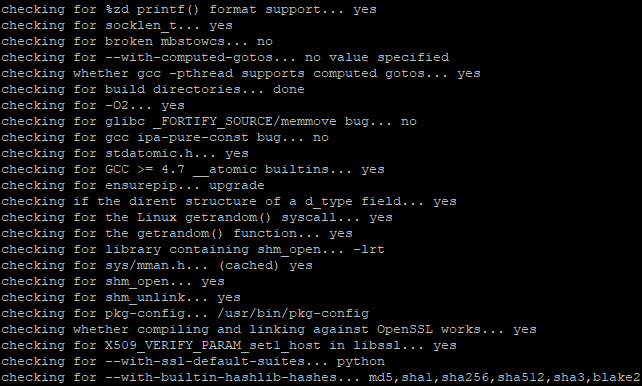
Once you ‘re in the source code directory, run the ./configure command to configure the Python source code for your system. The configure script will check your system for all of the required dependencies and will install them if they’re not already installed. This can take a few minutes, so be patient.
./configure --enable-optimizations
Sample output:
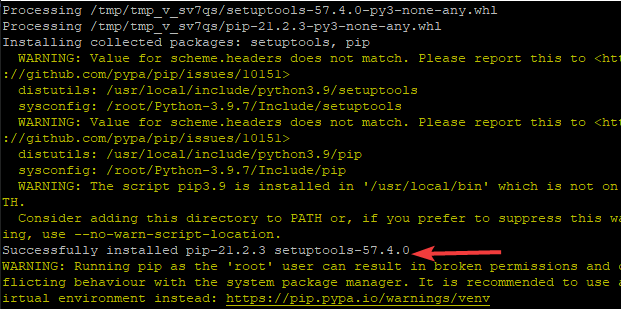
Once the altinstall command is complete, Python 3.9 has been successfully installed on your system!
Sample output:
Run the python3 -V command again to verify that Python 3.9 has been installed and is working correctly.
python3.9 --version
The output should show the Python 3.9.7 version number.
Creating a Python Program
Now that you’ve installed Python 3, let’s create our first program. In this section, we will create a simple program that prints the string “Hello, World!”
In the programming community, the Hello, World program is a tradition. It is a small program that simply prints a few words to show that it works, and it demonstrates a very simple process in a little “tutorial” program.
First, run the command below to create a new file called hello.py using nano. nano is a very simple text editor that is included in most Linux distributions. py is a convention that means “Python program”. You can name your file anything you want.
sudo nano hello.py
Once the text editor is open, enter the following line into it:
# This is a comment. Comments are lines in a Python program that are not executed. They are used to explain what the code does. Comments begin with a hash mark ( # ) and can span multiple lines.
# This program prints "Hello, World!"

print("Hello, World!")
print() in Python is a function that prints the arguments passed to it. The “Hello, World!” string has quotes around it because strings in Python are surrounded by quotes.
Exit out of the text editor by pressing CTRL+O (that’s the letter O) and then exit again to get back to your command-line interface. Now that you made changes, save them with CTRL+X (the letter X).
With our hello.py file created, we are ready to run it! Run the python3 hello.py command to run your program.
python3 hello.py
The python3 hello.py command above will run the Python program located at the hello.py file.
Running your first program in Python should result in a nice little “Hello, World!” message printed out for you on the screen. Congratulations, you just ran your first Python program!
Sample output:
![]()
![]()
Conclusion
Congratulations, you now have Python 3 installed and ran your first program! You should now be pretty comfortable with the basics of using a command line text editor such as nano and executing Python programs.
For more information about Python, check out its official website here.