Yarn is a package manager for Node (Node.js) and is a replacement for npm (node package manager). Instead of installing from a registry, Yarn installs packages from other nodes on your network that have already downloaded the packages. This speeds up the installation for projects with many node modules.
Yarn has some advantages: First, it tells you which version of an installed package is compatible with your project. Second, it makes your packages more secure by calculating the checksums of each package so in case a developer installs an outdated or corrupt package, Yarn can detect it.
It’s not easy to say whether Yarn is better than npm, but if you search for an easy-to-use package manager, yarn might be the right choice.
This tutorial will show you step-by-step how to Install yarn on Debian 11. We cover two different methods. First, we install yarn using the install script from Node Source, then we will install yarn using apt.
Prerequisites
- A server running Debian 11.
- A non-root user with sudo privileges.
System Update
Before installing any new packages, ensure your Debian installation is up-to-date. Run the below commands to install pending updates.
sudo apt-get update
sudo apt-get upgrade
Now we are ready to continue the Yarn installation.
Yarn Installation
This tutorial covers two different installation methods. The first one is to use the installation script from nodesource (chapter a). If you prefer using apt (which might be preferable as updates get installed via apt later), this is covered in chapter b.
a) Installing Yarn using Install Script from Nodesource
This procedure is quite simple. This is the easiest method to install yarn on your Debian 11 system. However, the version of yarn may not be the latest.
First, run the following command to install Nodejs to simplify the installation process. We will add the NodeSource repository to the system using the curl command and install Nodejs using the APT command.
curl -sL https://deb.nodesource.com/setup_16.x | sudo -E bash -
sudo apt install nodejs
Now we install Yarn with the following command:
curl -o- -L https://yarnpkg.com/install.sh | bash
During the installation, press Enter to accept the permissions and continue. It may look like nothing is happening, but Yarn is being installed in the background.
After following the steps above, Yarn should be installed on your machine and ready to use. To verify that Yarn is installed correctly, use the following command:
yarn -v
Yarn will display the version number of Yarn installed on your machine. If you get a message that Yarn cannot be found, restart your machine and rerun the above command.
![]()
![]()
b) Install Yarn Using the APT
You can also install it via APT, which is more stable and up-to-date than other methods.
Run the following commands to add the key and the yarn repository to your Debian 11 system.
curl -sS https://dl.yarnpkg.com/debian/pubkey.gpg | sudo apt-key add -
echo "deb [signed-by=/usr/share/keyrings/yarnkey.gpg] https://dl.yarnpkg.com/debian stable main" | sudo tee /etc/apt/sources.list.d/yarn.list
Now run the following command to update APT’s cache and install Yarn.
sudo apt-get update
sudo apt-get install yarn
After performing the above steps, Yarn should be installed on your machine and ready to use.
Using Yarn
Now it’s time to test if everything went right. In this step, we will create a simple project and download a package from the Internet. This way, we will test if Yarn is installed correctly and works properly on your computer.
First, create a new directory named testyarn and change it with the following command.
mkdir testyarn
cd testyarn
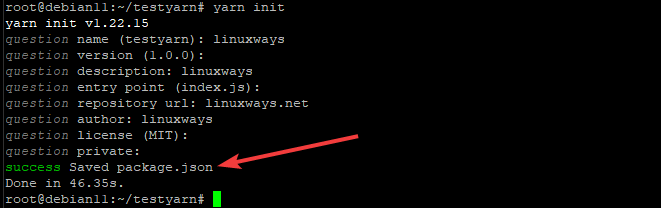
Once you are in this directory, run the yarn init command to start the Yarn project.
yarn init
When prompted, press enters to accept all the default options, or enter all the details per your requirements.
As a result of this command, the package.json file is created for your project, which contains a lot of standard information about your project. This information doesn’t do much more than register the project as a package with Yarn, but you can edit it if you want to assign other values.
Now that you have created a project use the yarn add command to add a package from Yarn’s official registry to your project. The syntax for this command is:
yarn add [some package name]
Where: [package name] is the actual name of the package you want to add. You can get all the available packages by visiting the official website and searching for them.
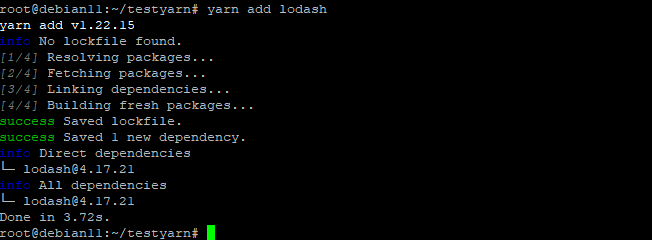
For example, to add the lodash package to your project, run the following command.
yarn add lodash
As a result of this command, the lodash package will be downloaded to your project and saved in the node_modules folder. It also creates a new file named yarn .lock, which should not be edited.
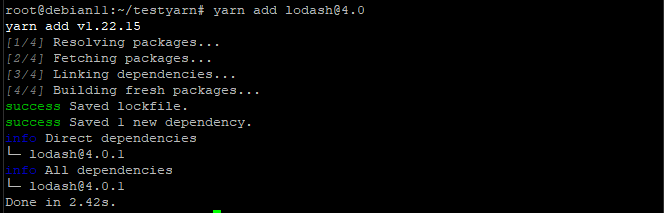
As a default, yarn adds command uses the latest package version. You can add a specific version number after the package name if you want.
yarn add [package_name]@[version_or_tag].
E.g. to add version 4.0 of lodash to your project, run the following command.
yarn add lodash@4.0
Sample output:
That’s it for this guide. Have fun using yarn in your javaScript and Node projects.