Drupal is a free and open source content management system written in PHP. It allows you to create and manage blogs and websites. It comes with over 17,000 addons/plugins that let you add, edit, publish and remove content online. It is multilingual, backward compatible, has a layout builder and automatic updates. It is used by millions of people and organizations around the world to create and maintain their websites.
In this post, you’ll learn how to install Drupal CMS with Apache and Let’s Encrypt SSL on Alma Linux 8.
Requirements
- A server running Alma Linux 8.
- A valid domain name pointing to the IP of your server.
- A root password configured on the server.
Install Apache, MariaDB and PHP
Drupal requires a LAMP stack to be installed on your server. First, install Apache and MariaDB with the following command:
dnf install httpd @mariadb -y
Next, reset the default PHP module and install the EPEL and Remi PHP repositories on your system.
dnf module -qy reset php
dnf install https://dl.fedoraproject.org/pub/epel/epel-release-latest-8.noarch.rpm
dnf install https://rpms.remirepo.net/enterprise/remi-release-8.rpm
Activate the Remi PHP repository with the following command:
dnf module install php:remi-8.0 -y
Once the repository is activated, install PHP and the other required extensions using the following command:
dnf install php php-cli php-fpm php-gd php-mysqlnd php-mbstring php-json php-common php-dba php-dbg php-devel php-embedded php-enchant php-bcmath php-gmp php-intl php-ldap php-odbc php-pdo php-opcache php-pear php-pgsql php-process php-snmp php-soap php-xml php-xmlrpc php-opcache unzip curl git -y
Once all the packages are installed, check the PHP version with the following command:
php -v
You will get the following output:
PHP 8.0.18 (cli) (built: Apr 13 2022 02:45:05) ( NTS gcc x86_64 )
Copyright (c) The PHP Group
Zend Engine v4.0.18, Copyright (c) Zend Technologies
    with Zend OPcache v8.0.18, Copyright (c), by Zend Technologies
Next, edit the PHP configuration file and change some default settings:
nano /etc/php.ini
Change the following settings:
memory_limit = 256M
date.timezone = UTC
Save and close the file when you are done. Then start the Apache, MariaDB and PHP FPM services and enable them so that they start after the system reboots:
systemctl start httpd mariadb php-fpm
systemctl enable httpd mariadb php-fpm
Configure MariaDB for Drupal
Since Drupal uses MariaDB or MySQL as its database backend, you need to set up a database and user for Drupal. First, log in to MariaDB with the following command:
mysql
Once logged in, create a database and user with the following command:
MariaDB [(none)]> CREATE DATABASE drupal;
MariaDB [(none)]> GRANT ALL PRIVILEGES ON drupal.* TO 'drupal'@'localhost' IDENTIFIED BY "securepassword";
Next, flush the permissions to apply the changes:
MariaDB [(none)]> FLUSH PRIVILEGES;
Exit the MariaDB shell with the following command:
MariaDB [(none)]> EXIT;
Download Drupal CMS
First, download the latest version of Drupal CMS from the official download page:
wget https://www.drupal.org/download-latest/tar.gz -O drupal.tar.gz
Once the download is complete, unzip the downloaded file using the following command:
tar xvf drupal.tar.gz
Move the unzipped directory to the Apache web root directory:
mv drupal-* /var/www/html/drupal
Next, change the ownership and access rights for the Drupal directory:
chown -R apache:apache /var/www/html/drupal
chmod -R 777 /var/www/html/drupal
Next, create a directory that is needed for Drupal:
mkdir /var/www/html/drupal/sites/default/files
Next, copy the file with the default settings using the following command:
cp /var/www/html/drupal/sites/default/default.settings.php /var/www/html/drupal/sites/default/settings.php
Configure Apache for Drupal
Next you need to create a configuration file for the Apache virtual host for Drupal. You can create it with the following command:
nano /etc/httpd/conf.d/drupal.conf
Paste the following lines:
<VirtualHost *:80>
     ServerName drupal.example.com
     ServerAdmin admin@example.com
     DocumentRoot /var/www/html/drupal/

     <Directory /var/www/html/drupal>
            Options Indexes FollowSymLinks
            AllowOverride All
            Require all granted
            RewriteEngine on
            RewriteBase /
            RewriteCond %{REQUEST_FILENAME} !-f
            RewriteCond %{REQUEST_FILENAME} !-d
            RewriteRule ^(.*)$ index.php?q=$1 [L,QSA]
    </Directory>
</VirtualHost>
Save and close the file and restart the Apache service with the following command:
systemctl restart httpd
Now you can check the status of Apache with the following command:
systemctl status httpd
You will get the following output:
? httpd.service - The Apache HTTP Server
   Loaded: loaded (/usr/lib/systemd/system/httpd.service; disabled; vendor preset: disabled)
  Drop-In: /usr/lib/systemd/system/httpd.service.d
           ??php-fpm.conf
   Active: active (running) since Fri 2022-04-15 09:02:40 UTC; 10s ago
     Docs: man:httpd.service(8)
 Main PID: 11104 (httpd)
   Status: "Running, listening on: port 80"
    Tasks: 213 (limit: 11412)
   Memory: 24.6M
   CGroup: /system.slice/httpd.service
           ??11104 /usr/sbin/httpd -DFOREGROUND
           ??11106 /usr/sbin/httpd -DFOREGROUND
           ??11107 /usr/sbin/httpd -DFOREGROUND
           ??11108 /usr/sbin/httpd -DFOREGROUND
           ??11109 /usr/sbin/httpd -DFOREGROUND

Apr 15 09:02:40 linux systemd[1]: httpd.service: Succeeded.
Apr 15 09:02:40 linux systemd[1]: Stopped The Apache HTTP Server.
Apr 15 09:02:40 linux systemd[1]: Starting The Apache HTTP Server...
Configure Firewall
Next, you need to allow HTTP and HTTPS services through the firewall. You can allow them with the following command:
firewall-cmd --add-service={http,https} --permanentNow reload the firewall to apply the changes:
firewall-cmd --reload
Access the Drupal Web Installation Wizard.
Now open your web browser and access the Drupal web interface using the URL http://drupal.example.com. You will be redirected to the following page:
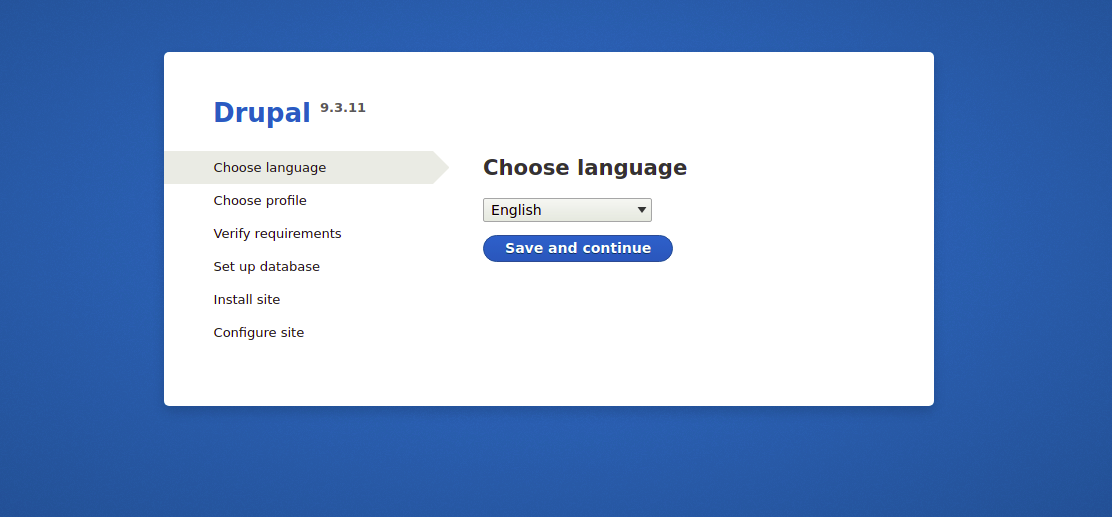
Select your language and click the ” Save and Continue” button. You should see the installation profile selection page:
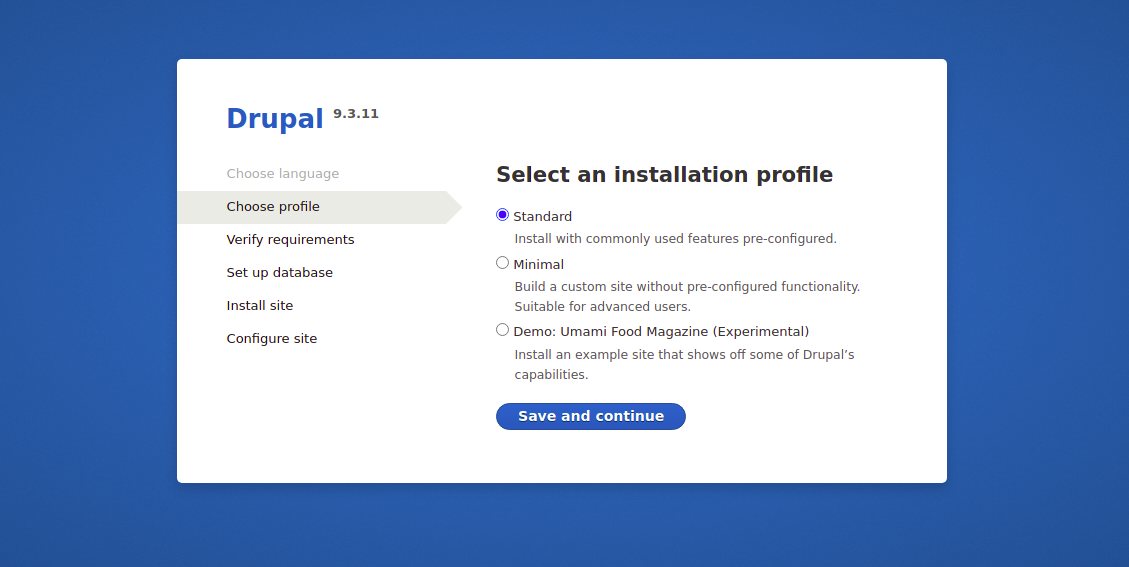
Select your installation profile and click the “Save and continue ” button. You should see the database configuration page:
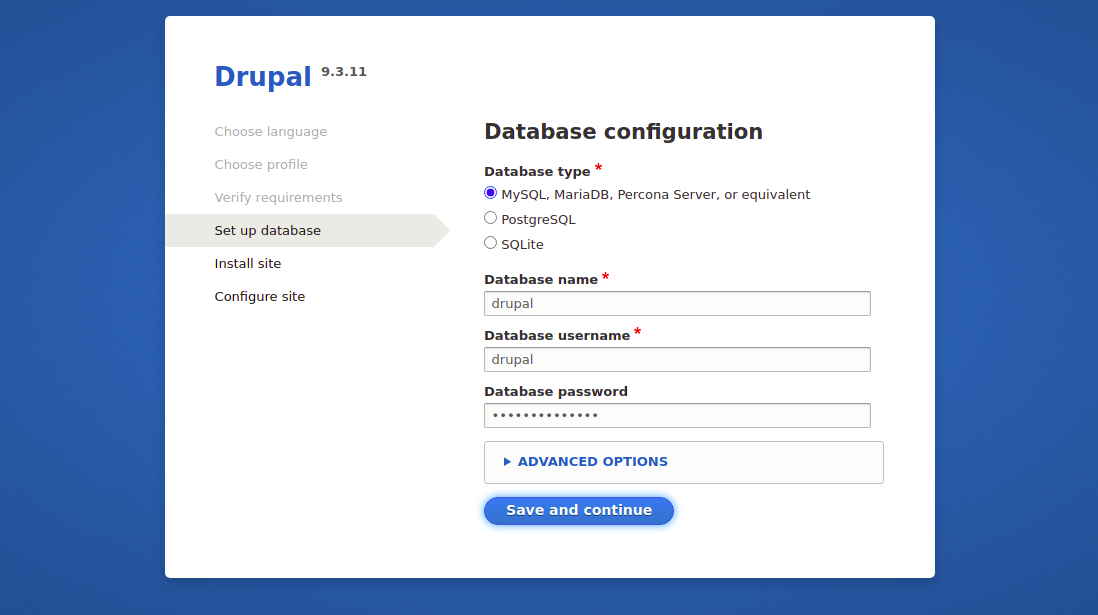
Enter your Drupal database details and click the “Save and continue” button. You should see the website configuration page:
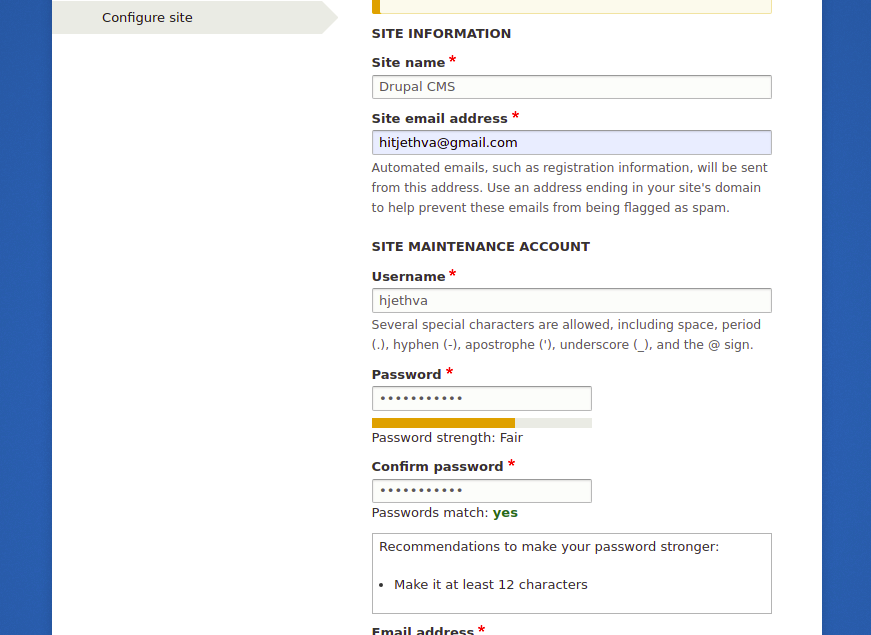
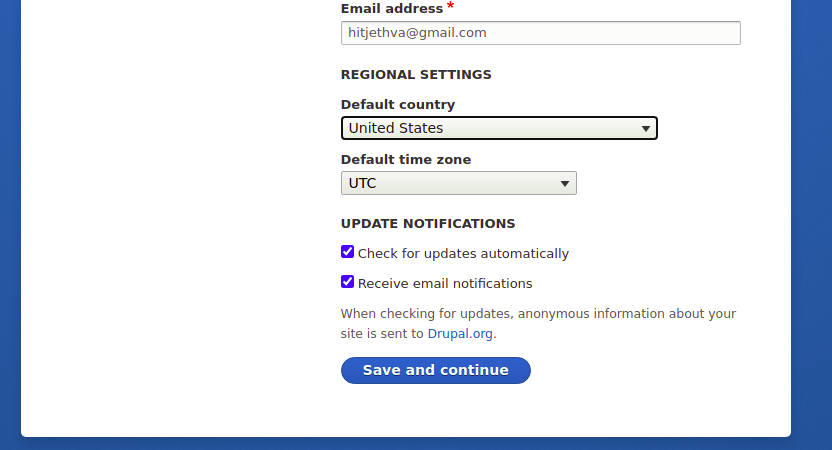
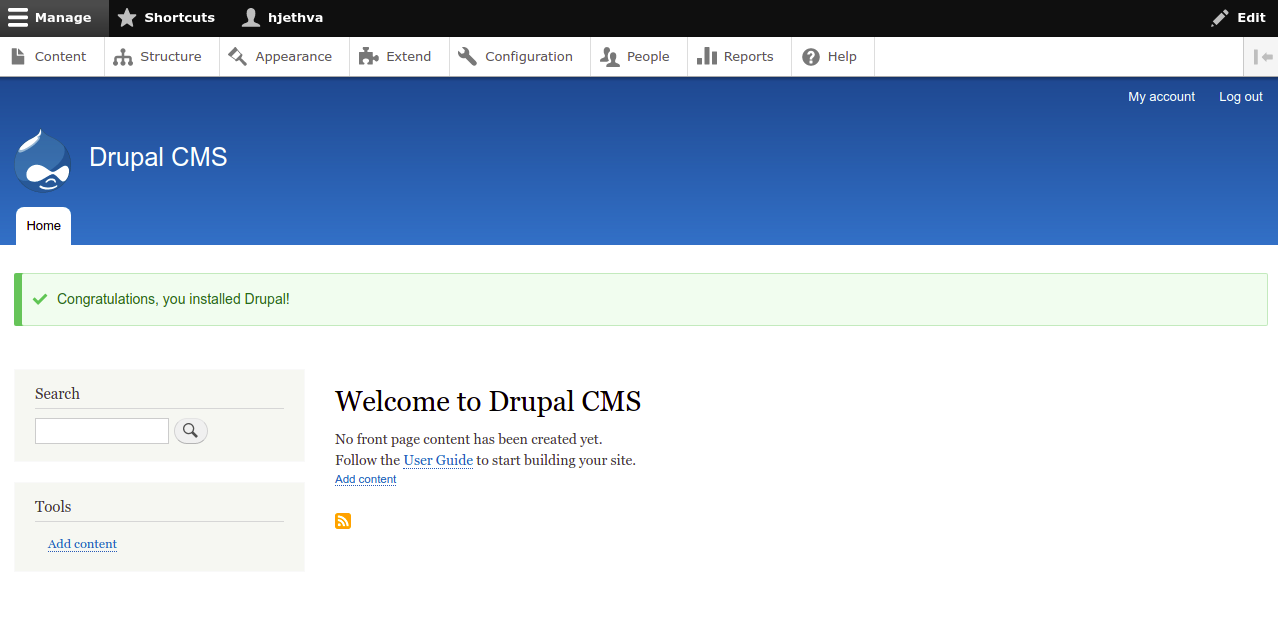
Enter your website configuration information and click the “Save and Continue” button. On the following page, you should see the Drupal dashboard:
Securing Drupal with Let’s Encrypt SSL.
Next, you need to install the Certbot client to install the Let’s Encrypt SSL for your website. You can install it with the following command:
dnf install epel-release -y dnf install certbot python3-certbot-apache
Next, get an SSL certificate for your Let’s domain and install it using the following command:
certbot --apache -d drupal.example.com
You will be asked to provide your email address and accept the terms of use:
Saving debug log to /var/log/letsencrypt/letsencrypt.log
Plugins selected: Authenticator apache, Installer apache
Enter email address (used for urgent renewal and security notices)
 (Enter 'c' to cancel): hitjethva@gmail.com

- - - - - - - - - - - - - - - - - - - - - - - - - - - - - - - - - - - - - - - -
Please read the Terms of Service at
https://letsencrypt.org/documents/LE-SA-v1.2-November-15-2017.pdf. You must
agree in order to register with the ACME server. Do you agree?
- - - - - - - - - - - - - - - - - - - - - - - - - - - - - - - - - - - - - - - -
(Y)es/(N)o: Y

- - - - - - - - - - - - - - - - - - - - - - - - - - - - - - - - - - - - - - - -
Would you be willing, once your first certificate is successfully issued, to
share your email address with the Electronic Frontier Foundation, a founding
partner of the Let's Encrypt project and the non-profit organization that
develops Certbot? We'd like to send you email about our work encrypting the web,
EFF news, campaigns, and ways to support digital freedom.
- - - - - - - - - - - - - - - - - - - - - - - - - - - - - - - - - - - - - - - -
(Y)es/(N)o: Y
Account registered.
Requesting a certificate for drupal.example.com
Performing the following challenges:
http-01 challenge for drupal.example.com
Waiting for verification...
Cleaning up challenges
Deploying Certificate to VirtualHost /etc/httpd/conf.d/drupal.conf
Redirecting all traffic on port 80 to ssl in /etc/httpd/conf.d/drupal.conf

- - - - - - - - - - - - - - - - - - - - - - - - - - - - - - - - - - - - - - - -
Congratulations! You have successfully enabled https://drupal.example.com
- - - - - - - - - - - - - - - - - - - - - - - - - - - - - - - - - - - - - - - -
Subscribe to the EFF mailing list (email: hitjethva@gmail.com).


IMPORTANT NOTES:
 - Congratulations! Your certificate and chain have been saved at:
   /etc/letsencrypt/live/drupal.example.com/fullchain.pem
   Your key file has been saved at:
   /etc/letsencrypt/live/drupal.example.com/privkey.pem
   Your certificate will expire on 2022-07-09. To obtain a new or
   tweaked version of this certificate in the future, simply run
   certbot again with the "certonly" option. To non-interactively
   renew *all* of your certificates, run "certbot renew"
 - If you like Certbot, please consider supporting our work by:

   Donating to ISRG / Let's Encrypt:   https://letsencrypt.org/donate
   Donating to EFF:                    https://eff.org/donate-le
Conclusion
Congratulations! You have successfully installed Drupal CMS with Apache and Let’s Encrypt SSL on Alma Linux 8. Now you can create your blog and website with Drupal CMS. If you still have any questions, feel free to contact me.