
Elasticsearch is a free and open-search software, meaning its source code can be inspected and used for any purpose. Elasticsearch is just one part of the ELK stack (Elasticsearch, Logstash, and Kibana) which constitute an open-source log analytics platform. It enables users to analyze data stored in virtually any structured or unstructured format across numerous search engines, databases, and other sources.
Shay Banon created Elasticsearch in 2010 because he needed a solution to manage all the machine data his company was receiving. He started working on it alone but quickly found contributors who helped him turn it into the most popular enterprise-grade log analysis platform available today.
The simplicity behind designing Elasticsearch has been one of its core principles. This is one of the reasons why it’s so easy to install and configure for small and large deployments. Elasticsearch requires only as little memory as ~160MB, making it possible to run on older servers with low CPU capacity, as long as they have enough storage space to store data indexes.
Another reason why Elasticsearch has proved popular is that it manages distributed searches across clusters of machines using the Apache Lucene library, allowing users to distribute their searches across multiple nodes in real time. The combination of management simplicity, scalability, and high availability has made Elasticsearch an open-source analytics darling that developers love working with because it requires minimal code changes when adding new capabilities.
Elasticsearch provides a distributed RESTful API that developers can query using HTTP calls, making it easy to use from popular programming languages such as Java, JavaScript, and Python. It provides various APIs, from full-text search to real-time analytics via its X-Pack extension. Elasticsearch has a strong community of engineers who have developed over 450 extension modules called “Logstash Plugins”, which enhance functionality and allow users to refine their searches without modifying the application’s source code.
When it comes down to choosing the right technology stack for an Elasticsearch deployment, there are certain items that IT teams should consider first before jumping into the deep end: analytics capabilities needed, security policies enforced within organizations will influence where Elasticsearch can be used, the number of nodes that will need to be deployed, location of the data set and type of workloads.
An open-source search platform built on Apache Lucene would typically require full-text analytics capabilities for text searches over unstructured or structured data. This means that developers would have to write custom code within applications to index content for this type of analytics because different databases would require specific indexing procedures depending on their use.
Elasticsearch requires very few code changes when it comes down to implementing new features into an existing application because its APIs abstract away differences between NoSQL databases, thus allowing companies using proprietary databases to implement elasticsearch.
Welcome to today’s guide on Elasticsearch. In this article, we will also cover some of the basics of how to use it, such as installing and configuring it, as well as some of the more advanced features available.
In this guide, we will use Debian 11 as our Operating System. Elasticsearch is available for most platforms, including Windows, Mac, and Linux. We will use the packaged version of Elasticsearch that can be downloaded from the official website at www.elastic.co.
Prerequisites
To follow along with this guide, you will need to have the following:
- A Debian system with a minimum of 8 Gb of Ram, two core processors, and 40 Gb of free disk space.
- A non-root user with sudo privilege set up on your system.
Updating your system
Before installing Elasticsearch, let’s first ensure that our system is up-to-date by running the following command.
sudo apt update && sudo apt upgrade -y
Once the update command completes, run the command below to install the required dependencies. gnupg2 is required to verify the Elasticsearch download. apt-transport-https is required to install from https:// URLs.
sudo apt install -y build-essential git

sudo apt -y install curl software-properties-common gnupg2

sudo apt -y install apt-transport-https ca-certificates
Installing Java
Elasticsearch requires Java 8 or later to be installed to run. Elasticsearch requires the JDK (Java Development Kit) to be installed, not the JRE(Java Runtime Environment). You can check if you have Java installed on your system by running the following command.
java -version
If Java is not installed, you will get a message similar to the one below.
![]()
![]()
In this guide, we will install OpenJDK 11. Install it by running the following command.
sudo apt -y install default-jdk
Make sure that Java is installed correctly by checking the version number. You should see something similar to the image below.
java -version

After Installing JDK, you will need to configure the JAVA_HOME Environment Variable. The JAVA_HOME Environment Variable is an environment variable that points to the installation directory of the Java Development Kit.
First, run the sudo update-alternatives –config java command below to determine the current Java installation path.
sudo update-alternatives --config java
You should see an output similar to the one below. You can see the /usr/lib/jvm/java-11-openjdk-amd64/bin/java path, which leads to your java executable.

Next, we must create the JAVA_HOME environment variable and set the value to /usr/lib/jvm/java-11-openjdk-amd64. You can do this by running the following command.
sudo nano /etc/environment
At the end of the file, add the following line. Notice that we will cut off the trailing bin/java. Why must we cut off this line? Because we’re going to directly put the value of /usr/lib/jvm/java-11-openjdk-amd64 as JAVA_HOME instead. Also, note that you would have to keep the \ before and after the line.
JAVA_HOME="/usr/lib/jvm/java-11-openjdk-amd64/"
Save and close the file. Then, run the following command to reload the environment variables to your current session.
source /etc/environment
After running this command, you can check if the JAVA_HOME is set correctly by running the command below.
echo $JAVA_HOME
You should see the path to your java installation directory within the JAVA_HOME string.
![]()
![]()
Installing Elasticsearch
The standard Debian 11 does not ship with a package for Elasticsearch. Luckily the Elasticsearch developer team has provided their own repository, which contains the packages for Debian. Let’s add the Elasticsearch repo to our system by running the following commands.
The command below will download and import the public GPG key to the APT.
wget -qO - https://artifacts.elastic.co/GPG-KEY-elasticsearch | sudo apt-key add -
You will get an OK response if the key is imported correctly.
![]()
![]()
Next, we will add the Elasticsearch repository to our system by running the following command.
echo "deb https://artifacts.elastic.co/packages/oss-7.x/apt stable main" | sudo tee /etc/apt/sources.list.d/elastic-7.x.list
- “deb https://artifacts.elastic.co/packages/oss-7.x/apt stable main” | is the source of where we will get the Elasticsearch packages from.
- “sudo tee /etc/apt/sources.list.d/elastic-7.x.list” is just a syntax we use to create or overwrite the file called /etc/apt/sources.list.d/elastic-7.x.list.
The command below will refresh your system packages index and update the list of available packages from the Elasticsearch repository.
sudo apt update -y
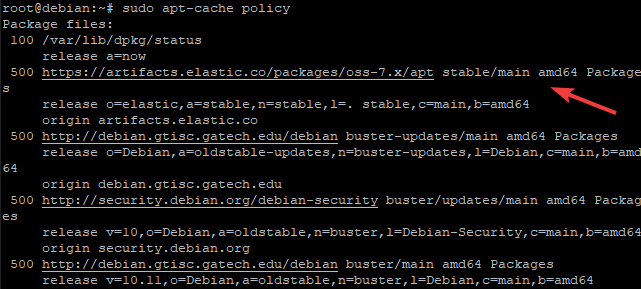
Run the sudo apt-cache policy command to check if the Elasticsearch repository has been added to your system correctly.
sudo apt-cache policy
The output is similar to what is shown in the image below.
Now that we have the Elasticsearch repository added, we can install the Elasticsearch package by running the following command.
sudo apt install elasticsearch -y
Configuring Elasticsearch
After installing Elasticsearch, you will need to configure it. The configuration file for Elasticsearch is located at /etc/elasticsearch/elasticsearch.yml.Elasticsearch uses YAML files to store its configuration. YAML files have a .yml file extension and are human-readable by means of being very similar to INI files. The Elasticsearch configuration file is often placed in cloud hosting environments, where each node within the cluster can be customized without any downtime.
Elasticsearch will use an existing config file if it exists or will create a new one if it doesn’t. You can see the default configuration file below.
You can open the file for editing by running the following command.
sudo nano /etc/elasticsearch/elasticsearch.yml
The most important thing to change in the config file is the networking. By default, Elasticsearch uses unicast networking, which is not ideal for clustering and high availability. We will use multicast networking by adding the below line in the config file.
network.host: "0.0.0.0"
There are several other things that we recommend configuring on your Elasticsearch server, such as cluster.name. The cluster.name is just a name for your Elasticsearch cluster. If you run a single node or have just restarted the Elasticsearch installation, you can leave the default settings intact.
cluster.name: "MyClusterName"
Before:


After:


jvm.options is another important setting. JVM is a Java Virtual Machine, and options is a list of comma-separated Java system properties.
The default minimum memory set for the JVM process is 128MB. If you have a lot of data in Elasticsearch then you may need to increase the memory size for Elasticsearch.
You should set the minimum Java heap space to 512 MB or even 1 GB if you have a lot of data.
sudo nano /etc/elasticsearch/jvm.options
-Xms1g
-Xmx1g

Xms stands for minimum Java heap space, and Xmx is maximum Java Heap Space. Setting the min and max JVM heap space to the same value is recommended.
Why? Because the JVM will initially allocate as much memory as is specified by -Xms, but it won’t reserve the entire heap space. If the process needs more memory later, it will try to get it from the operating system. However, if the operating system doesn’t have enough free memory, the JVM may fail or swap out (page out) memory to the OS, slowing everything down.
Save and close the file after making changes by pressing CTRL+X and confirming the changes with Y.
After configuring the file, you can restart and enable Elasticsearch by running the following command.
sudo systemctl restart elasticsearch.service
sudo systemctl enable elasticsearch.service
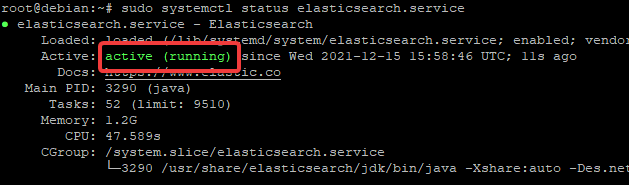
The service status can be checked using the systemctl status elasticsearch.service command.
sudo systemctl status elasticsearch.service
The service status should be active (running), as shown in the image below.
To prevent unauthorized access to your Elasticsearch instance, set a password now using elasticssearch-reset-password command:
elasticsearch-reset-password -u elastic
More information on how to set a password in Elasticsearch can be found here.
Testing Elasticsearch
Your Elasticsearch cluster is now ready to use. You can test it by running the following command.
curl -X GET "http://localhost:9200/?pretty"
The curl command is used to get the response in XML format. http://localhost:9200/?pretty: there are 2 parts in this line here. First, it tells Apache to listen on port 9200 for requests. Second, it tells Apache what to return when an HTTP request is sent to the server. If Elasticsearch is appropriately installed, you should get the following response.
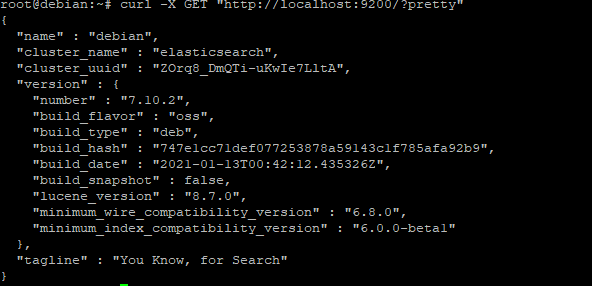
In the output, you can see some info like:
- “tagline”: “You Know, for Search” is the response body’s content.
- “build_hash”: “747e1cc71def077253878a59143c1f785afa92b9” is the hash value of the build. This can be used for comparison if you want to verify that you are running the same build version as the author.
- “cluster_uuid” : “ZOrq8_DmQTi-uKwIe7LltA” is the UUID of the cluster.
- “version”: { is the list of versions that are part of this particular Elasticsearch release.
- “minimum_wire_compatibility_version”: “6.8.0” is the minimum version of Elasticsearch that is compatible with this particular release.
- “minimum_index_compatibility_version”: “6.0.0-beta1” is the minimum version of Elasticsearch that is compatible with the indices in this cluster.
Conclusion
In this article, you have learned how to install Elasticsearch and configure the Elasticsearch JVM options file. You have also learned how to test your cluster. Finally, you have been introduced to some of the components of an Elasticsearch response.
For more information about Elasticsearch, see its official documentation.