Gitea is a lightweight, open-source and self-hosted code hosting solution, similar to GitHub, Gitlab and BitBucket. It is mainly written in Go and can run on Windows, Linux, macOS, ARM, etc. Gitea was developed as a fork of Gogs and published under the MIT license.
Gitea is easy to install and offers several options for installation. You can install Gitea with the binary for your platform and architecture, install and ship it as a container with Docker, or install it as a package (.deb, .rpm). Gitea has minimal system requirements and can be installed on a machine with 2CPU cores and 1GB RAM, typically for small projects/teams. It is a lightweight, feature-rich and self-hosted alternative to services like GitHub.
In this guide, you’ll learn how to set up your own Git server hosting with Gitea on Rocky Linux Server. You will install Gitea on Rocky Linux with the PostgreSQL database and use the Apache/httpd web server as a reverse proxy and SSL from Letsencrypt to secure your deployment.
Requirements
- A Rocky Linux server – assuming you are using a fresh Rocky Linux server installation.
- A root user or a user with root privileges – to install new packages and make system-wide changes.
Preparation: Installing the PostgreSQL database
In this first step, you will prepare your Gitea installation by installing and configuring the PostgreSQL database and creating a new database and user to use Gitea.
1. the Rocky Linux repository provides multiple versions of PostgreSQL packages by default. It comes as a repository module, which you can check with the following command.
sudo dnf module list postgresql
You will see three different versions of PostgreSQL. Activate the latest PostgreSQL 13 by executing the following DNF command.
sudo dnf module enable postgresql:13
Type“y” and press“Enter” to activate the repository module.

Now you can install the PostgreSQL database with the following command.
sudo dnf install postgresql postgresql-server
Enter“y” and press “Enter” to confirm and continue the installation.

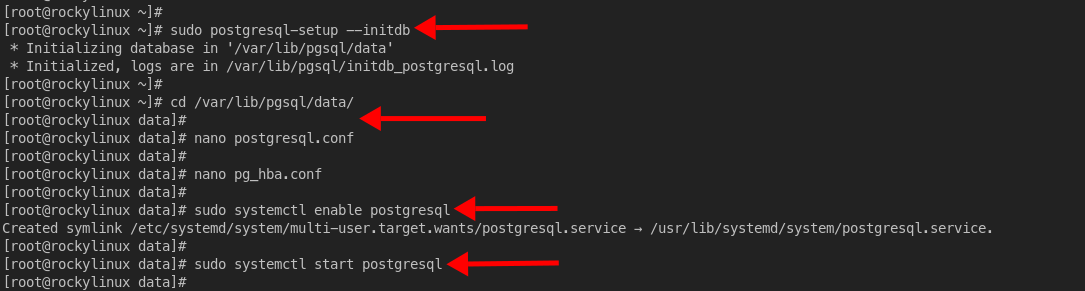
2. when the PostgreSQL installation is complete, execute the following command to initialize PostgreSQL data and directories.
sudo postgresql-setup --initdb
Then change to the working directory“/var/lib/pgsql/data” to edit some configurations.
cd /var/lib/pgsql/data/
Edit the configuration “postgresql.conf” with nano.
nano postgresql.conf
Remove the comment character from the option“password_encryption” and change the value to“scram-sha-256“.
password_encryption = scram-sha-256
This configuration enables all new users to use the secure“scram-sha-256” password encryption, which is more secure than the standard“md5” method.
Save the configuration by pressing the“Ctrl+x” key, entering“y” and then pressing“Enter“.
Next, edit the configuration “pg_hba.conf” with nano.
nano pg_hba.conf
Change the default authentication method for local connections to“scram-sha-256” (see below).
host    all             all             127.0.0.1/32            scram-sha-256
# IPv6 local connections:
host    all             all             ::1/128                 scram-sha-256
Press the ” Ctrl+x” key, enter“y” and then press“Enter” to save and exit the configuration.
Now execute the following command to activate and start the PostgreSQL service.
sudo systemctl enable postgresql
sudo systemctl start postgresql
Check the PostgreSQL service with the following command.
sudo systemctl status postgresql
Below you will see a similar output that you will receive.
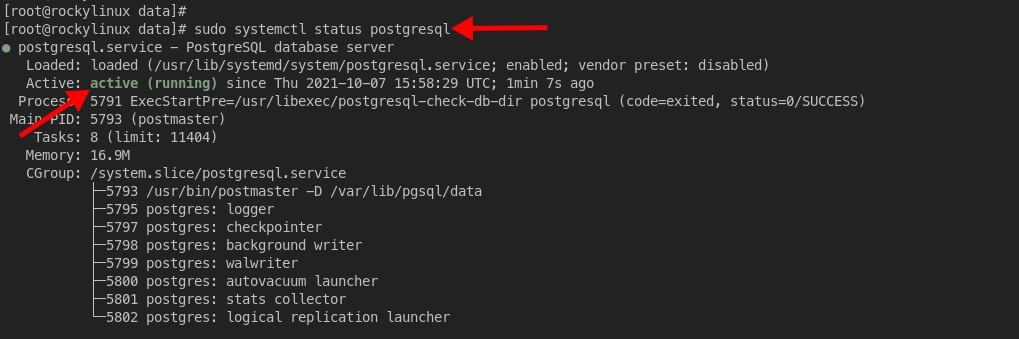
The current status of the PostgreSQL service is “active (running)” and it is enabled to start automatically at system startup.
3. after you have successfully installed and configured the PostgreSQL server, create a new database and a new user for the Gitea installation. Execute the following command to log in to the PostgreSQL shell.
sudo -u postgres psql
Use the following query to create a new user“gitea” with the password“gitea“.
CREATE ROLE gitea WITH LOGIN PASSWORD 'gitea';
Create a new database “giteadb” with the owner“gitea” using the following query.
CREATE DATABASE giteadb WITH OWNER gitea TEMPLATE template0 ENCODING UTF8 LC_COLLATE 'en_US.UTF-8' LC_CTYPE 'en_US.UTF-8';

Check your database and your user with the query.
\l
\du
- The query “\l” shows the list of databases on your PostgreSQL server and ensures that the database “giteadb” is available.
- The query “\du” displays all available users and their attributes on the PostgreSQL server and ensures that the database user “gitea” is available.
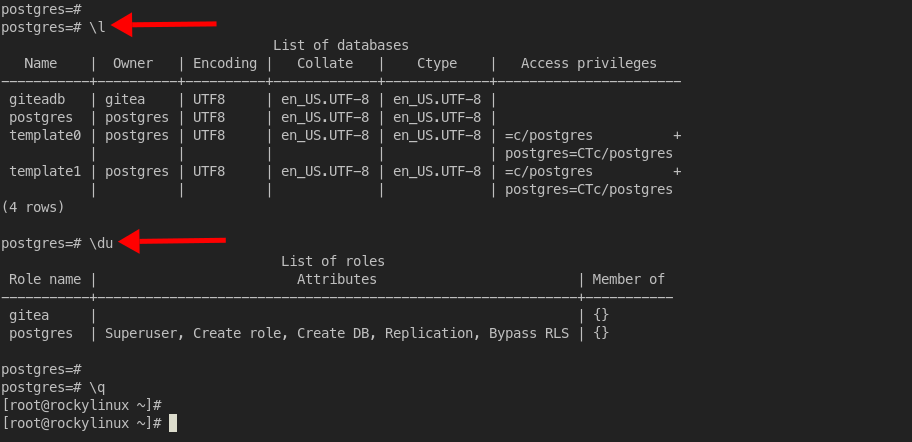
Now execute the query‘\q‘ to exit the PostgreSQL shell.
Installing and configuring Gitea on Rocky Linux
In this guide, you will install Gitea using the binary provided by Gitea. You will create a new system user and the Gitea data directories and set up Gitea as a systemd service.
First you need to install the Git packages on Rocky Linux using the DNF command below.
sudo dnf install git -y
And then you can proceed with the installation of gitea.
1. run the following command to create a new system user ‘git’. The gitea service will run as user ‘git’.
useradd \
  --create-home \
  --shell /bin/bash \
  --system \
  --user-group \
 git
Create a new gitea data directory “/var/lib/gitea/” and change the owner to the user “git” and the permission to “750” with the following command.
mkdir -p /var/lib/gitea/{custom,data,log}chown -R git:git /var/lib/gitea/
chmod -R 750 /var/lib/gitea/
All data of the Gitea installation is stored in the directory“/var/lib/gitea/“, including the data of the user’s repositories.
Next, create a new configuration directory“/etc/gitea” and change the owner and permissions for this directory.
mkdir /etc/gitea
chown root:git /etc/gitea
chmod 770 /etc/gitea
Then create the Gitea configuration file “app.ini” in the directory“/etc/gitea” and make sure that the user“git” has write permissions for the file“app.ini“.
touch /etc/gitea/app.ini
chown git:git /etc/gitea/app.ini
Now you can download and configure the Gitea binary file.
2. to download the Gitea binary, open the download page, select the desired version and download it using the wget command.
wget -O gitea https://dl.gitea.io/gitea/1.15.3/gitea-1.15.3-linux-amd64
When the download process is complete, make the “gitea” file executable and move it to the “/usr/local/bin” directory using the following command.
chmod +x gitea
cp gitea /usr/local/bin/gitea
Continue the installation to set up gitea as a systemd service.
3. create a new systemd service file“gitea.service” in the directory“/etc/systemd/system” with the editor nano.
nano /etc/systemd/system/gitea.service
Copy and paste the following configuration.
[Unit]
Description=Gitea (Git with a cup of tea)
After=syslog.target
After=network.target
Wants=postgresql.service
After=postgresql.service

[Service]
#LimitMEMLOCK=infinity
#LimitNOFILE=65535
RestartSec=2s
Type=simple
User=git
Group=git
WorkingDirectory=/var/lib/gitea/
#RuntimeDirectory=gitea
ExecStart=/usr/local/bin/gitea web --config /etc/gitea/app.ini
Restart=always
Environment=USER=git HOME=/home/git GITEA_WORK_DIR=/var/lib/gitea

[Install]
WantedBy=multi-user.target
Save the configuration by pressing the“Ctrl+x” key, entering“y” to confirm and ending with“Enter“.
Next, reload the systemd manager to apply a new service file with the following command.
sudo systemctl daemon-reload
Now execute the following command to activate and start the gitea service.
sudo systemctl enable gitea
sudo systemctl start gitea
Make sure you don’t get any errors and then check the gitea service with the following command.
sudo systemctl status gitea
If your installation is correct, you will see an output similar to the one below.
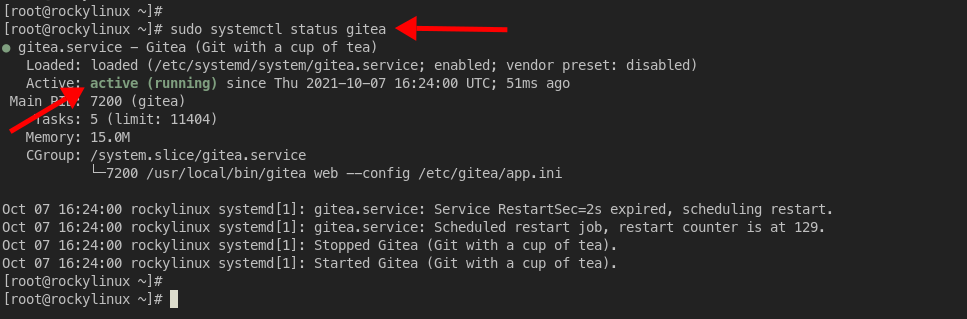
The status of the gitea service is“active (running)” and will start automatically at system startup. Further information: The gitea service runs on TCP port“3000” by default.
Setting up Apache as a reverse proxy
In this step, you install and configure the httpd web server as a reverse proxy for gitea. You also create Letsencrypt with the certbot SSL tool to secure the use of gitea.
Before you install the packages, activate the EPEL repository on the Rocky Linux system with the DNF command below.
sudo dnf install -y epel-release
Now you can install the httpd and certbot packages.
1. run the following DNF command to install httpd, certbot and the certbot Apache plugin on the Rocky Linux system.
sudo dnf install httpd certbot python3-certbot-apache -y
Type“y” and press“Enter” to confirm and continue the installation.
When the installation is complete, generate SSL certificates for localhost using the openssl command below.
openssl req -newkey rsa:2048 -nodes -keyout /etc/pki/tls/private/localhost.key -x509 -days 365 -out /etc/pki/tls/certs/localhost.crt
Simply press “Enter” to confirm all questions.
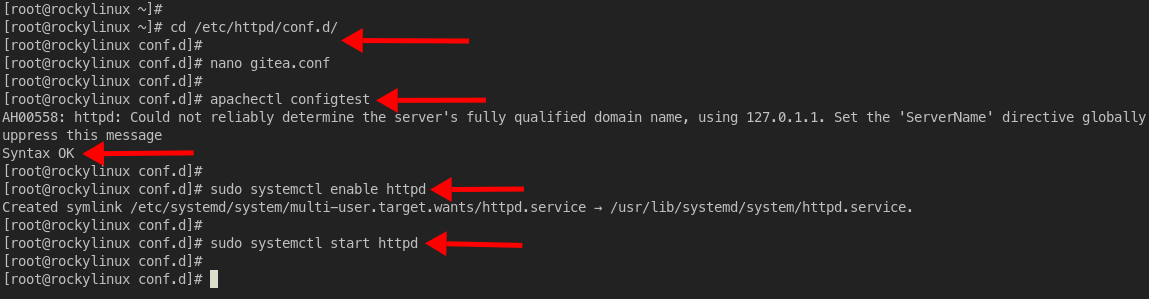
2. next, change the working directory to the directory“/etc/httpd/conf.d” and create a new configuration for the virtual host“gitea.conf” with nano.
cd /etc/httpd/conf.d/
nano gitea.conf
Change the domain name to your own and confirm the configuration.
# httpd port 80
<VirtualHost *:80>
  ServerName git.example.io

  ErrorLog /var/log/httpd/git.example.io-error.log
  CustomLog /var/log/httpd/git.example.io-access.log combined
ProxyPreserveHost On
ProxyRequests off
AllowEncodedSlashes NoDecode
ProxyPass / http://localhost:3000/ nocanon
ProxyPassReverse / http://localhost:3000/

</VirtualHost>
Now press the“Ctrl+x” key, enter“y” and then press“Enter” to save and exit.
Next, run the apachectl command to check your httpd configuration and make sure there are no errors.
apachectl configtest
If you have no errors, enable and start the httpd service with the following systemctl command.
sudo systemctl enable httpd
sudo systemctl start httpd
The httpd service will run with the new configuration of the virtual host“gitea.conf“.
3. to secure your Gitea installation, you can set up SSL certificates from lets-encrypt on the httpd web server. Execute the following certbot command to generate SSL certificates from letsencrypt for the domain“git.example.io“.
sudo certbot --apache -d git.example.io
Replace the domain “git.example.io” with your domain and make sure that your domain resolves to the IP address of the server.
You will now be asked a few questions.
- An e-mail address: When the SSL certificate expires, you will be directed to this email.
- Letsencrypt TOS (Terms of Service): Enter“A” to agree.
- Share email with the EFF: You can select “N” for no.
- Automatically redirect HTTP to HTTPS: Select the number “2” to enable automatic redirection.
Once the process is complete, you will see that the SSL certificates are available in the“/etc/letsencrypt/live/git.example.io” directory. In addition, the configuration of your virtual httpd host has changed due to the additional SSL configuration of letsencrypt.
Gitea first configuration
At this stage you have completed the installation of Gitea. Now you will set up your Gitea installation and create a new administrator user.
Open your web browser and go to the domain of the Gitea installation.
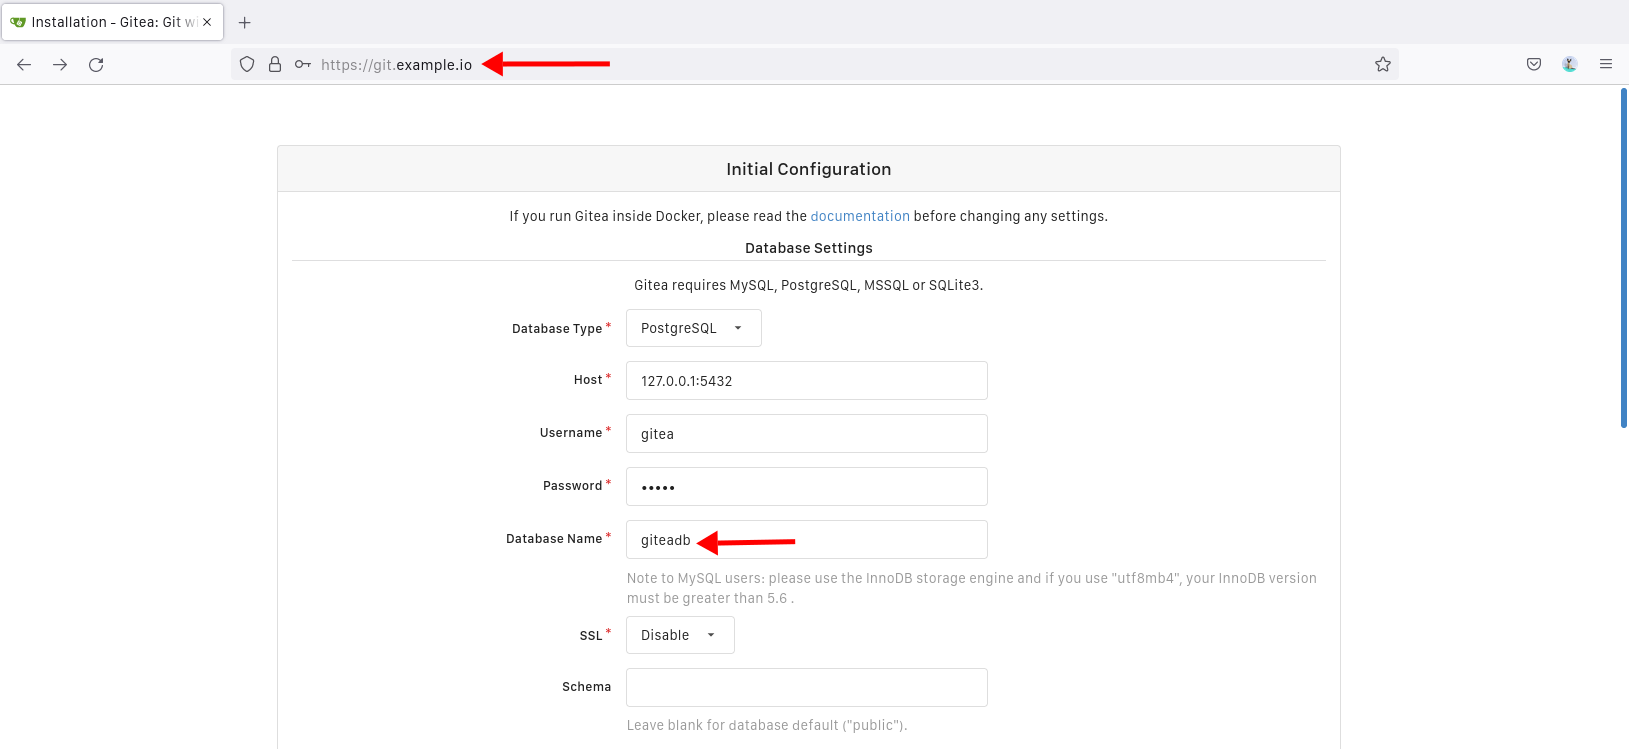
1. first enter the details of the PostgreSQL database for your Gitea installation in the“Database settings” area
- Database type: PostgreSQL
- Username: gitea
- Password: gitea
- Database name: giteadb
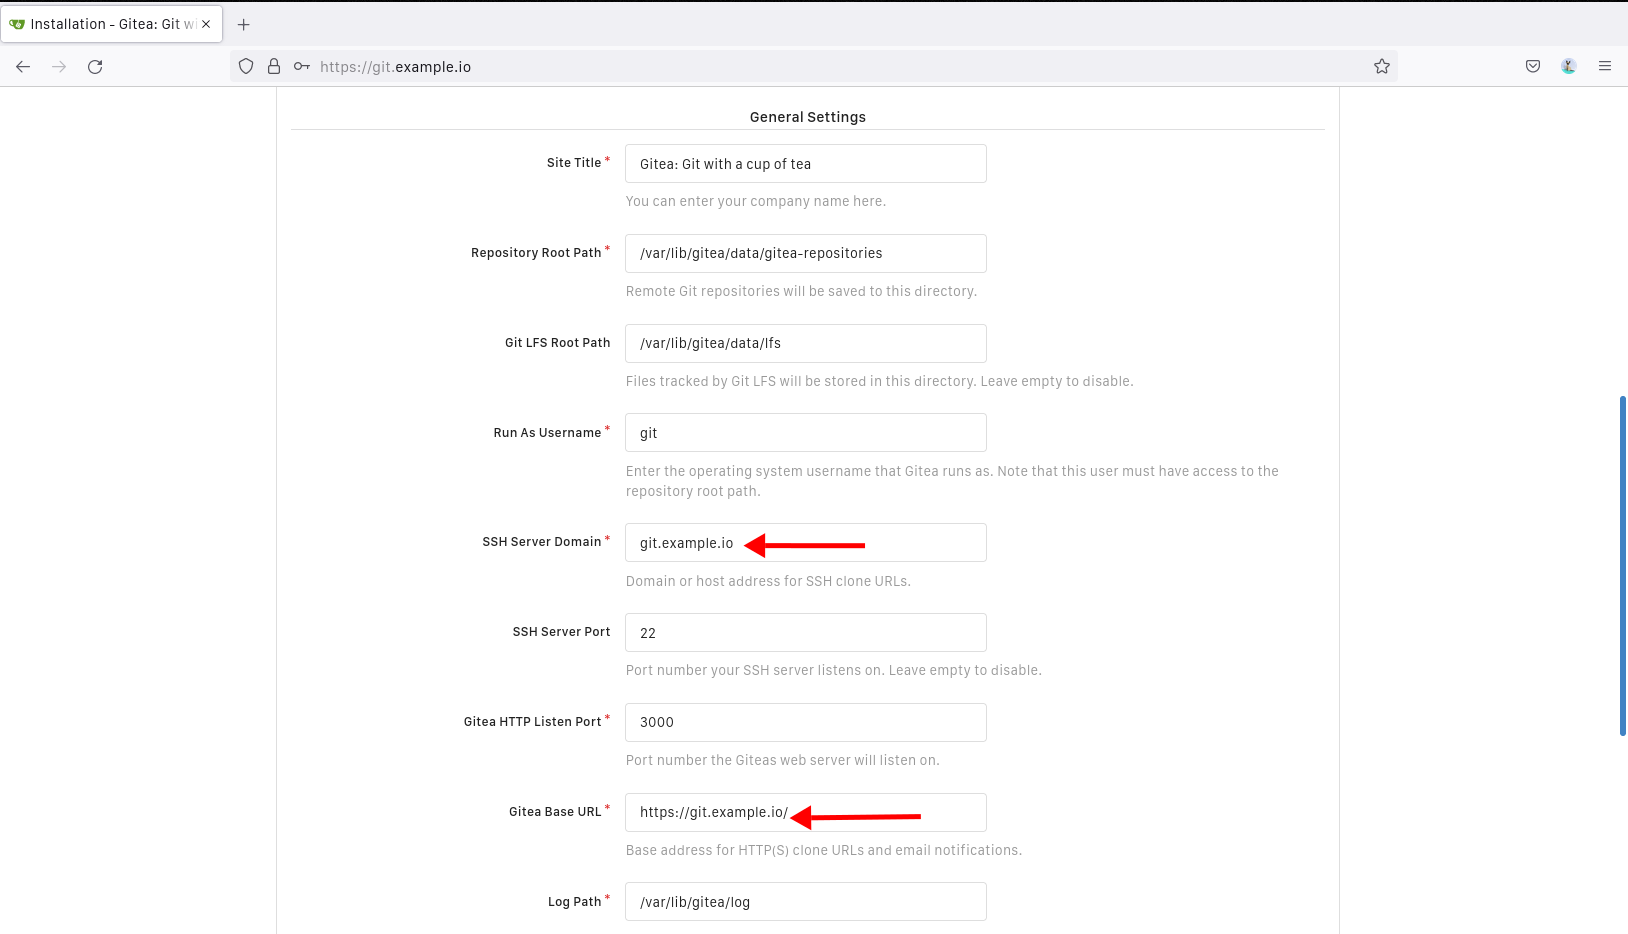
2. next, go to the “General settings” section and configure the details of the gitea installation with the following configuration.
- Website title: Gitea: Git with a cup of tea
- SSH server domain: git.example.io (this activates SSH support)
- SSH server port: 22
- Gitea Base URL: https://git.example.io
3. go to the“Optional settings” and click on the additional option“Administrator account settings“.
Create a new administrator user for Gitea:
- Administrator Username: johndoe
- Password: johndoe ********
- Confirm the password: ********
- E-mail address: john@example.io
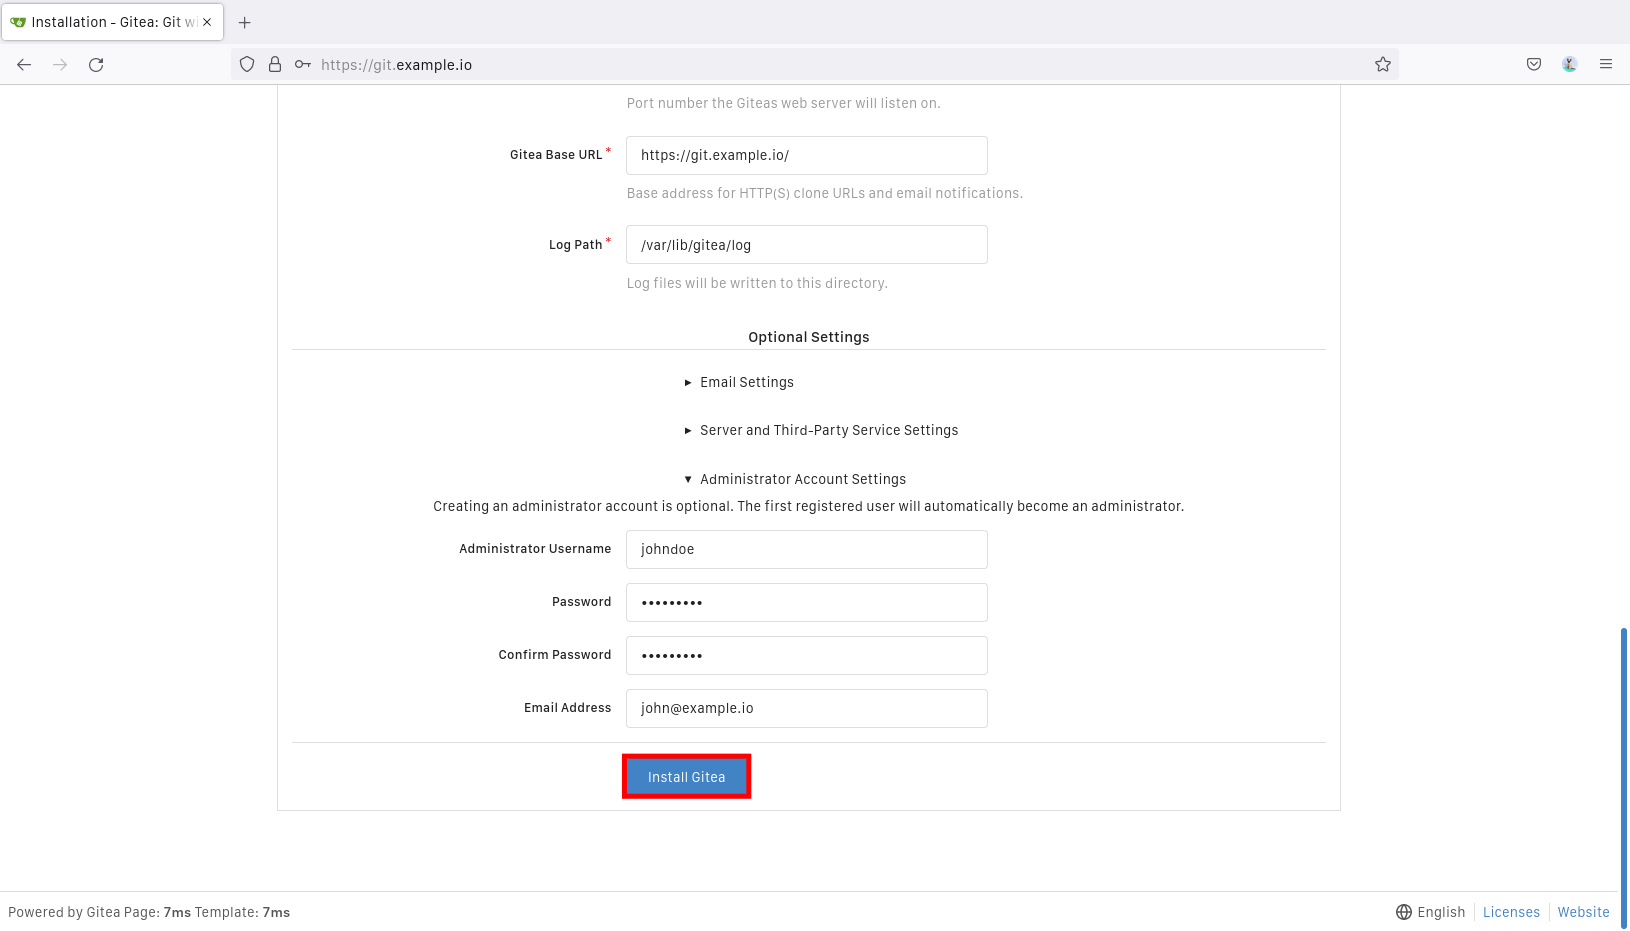
Now click on the“Install Gitea” button to start your Gitea installation.
4. if the installation is correct, you will be redirected to the Gitea home page (see below).
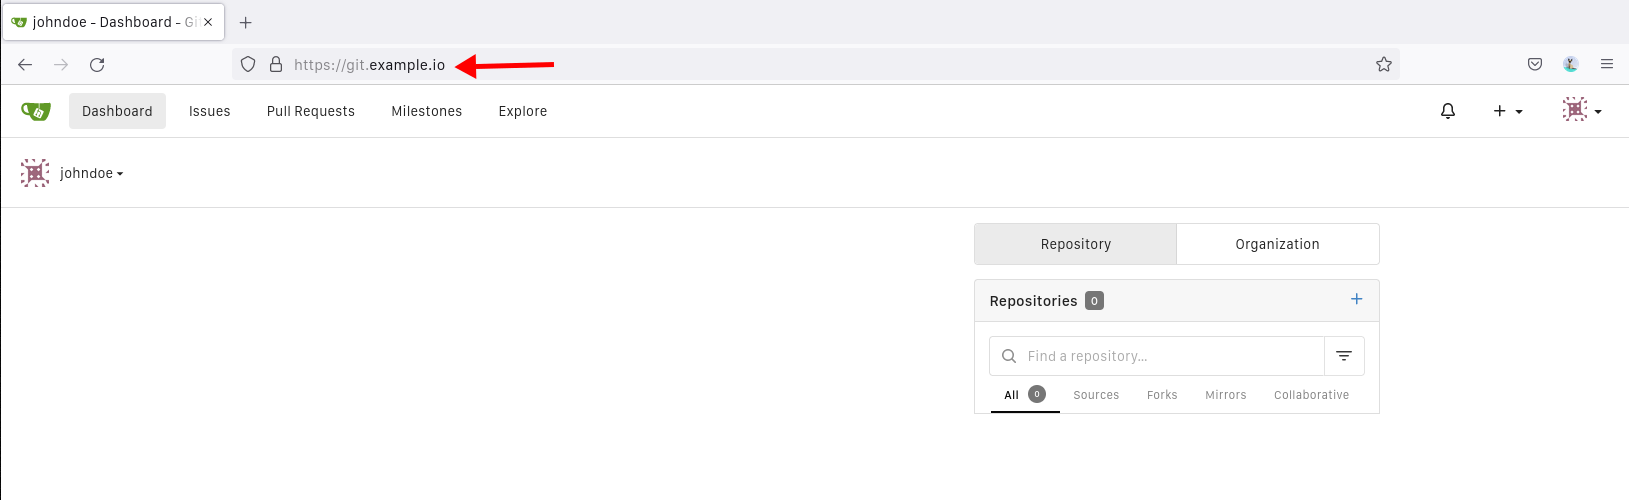
Now you can create repositories and host your code with Gitea.
Common problem:
- * If you are redirected to the“http://localhost:3000” address, this means that you need to set up your “Gitea Base URL” domain name correctly. Make sure the value for “Gitea Base URL” is the domain name you are using for the Gitea installation.
- * If you get a message like“503 Service unavailable” after the installation, go back to the server terminal and restart the Gitea service.
sudo systemctl restart gitea
Now go back to your Gitea home page and reload the tab.
Create a new repository and push code
On the standard start page of gitea you will see the sections “Repository” and“Organization“.
1. go to the “Repository” section and click on the“+” button to create a new repository.

Enter the repository configuration details as follows.
- Repository name: dotfiles
- Visibility: Mark as check for private repository
- Description: Enter your description
Scroll to the bottom and click on the“Create” button.
You have successfully created a new repository on Gitea.
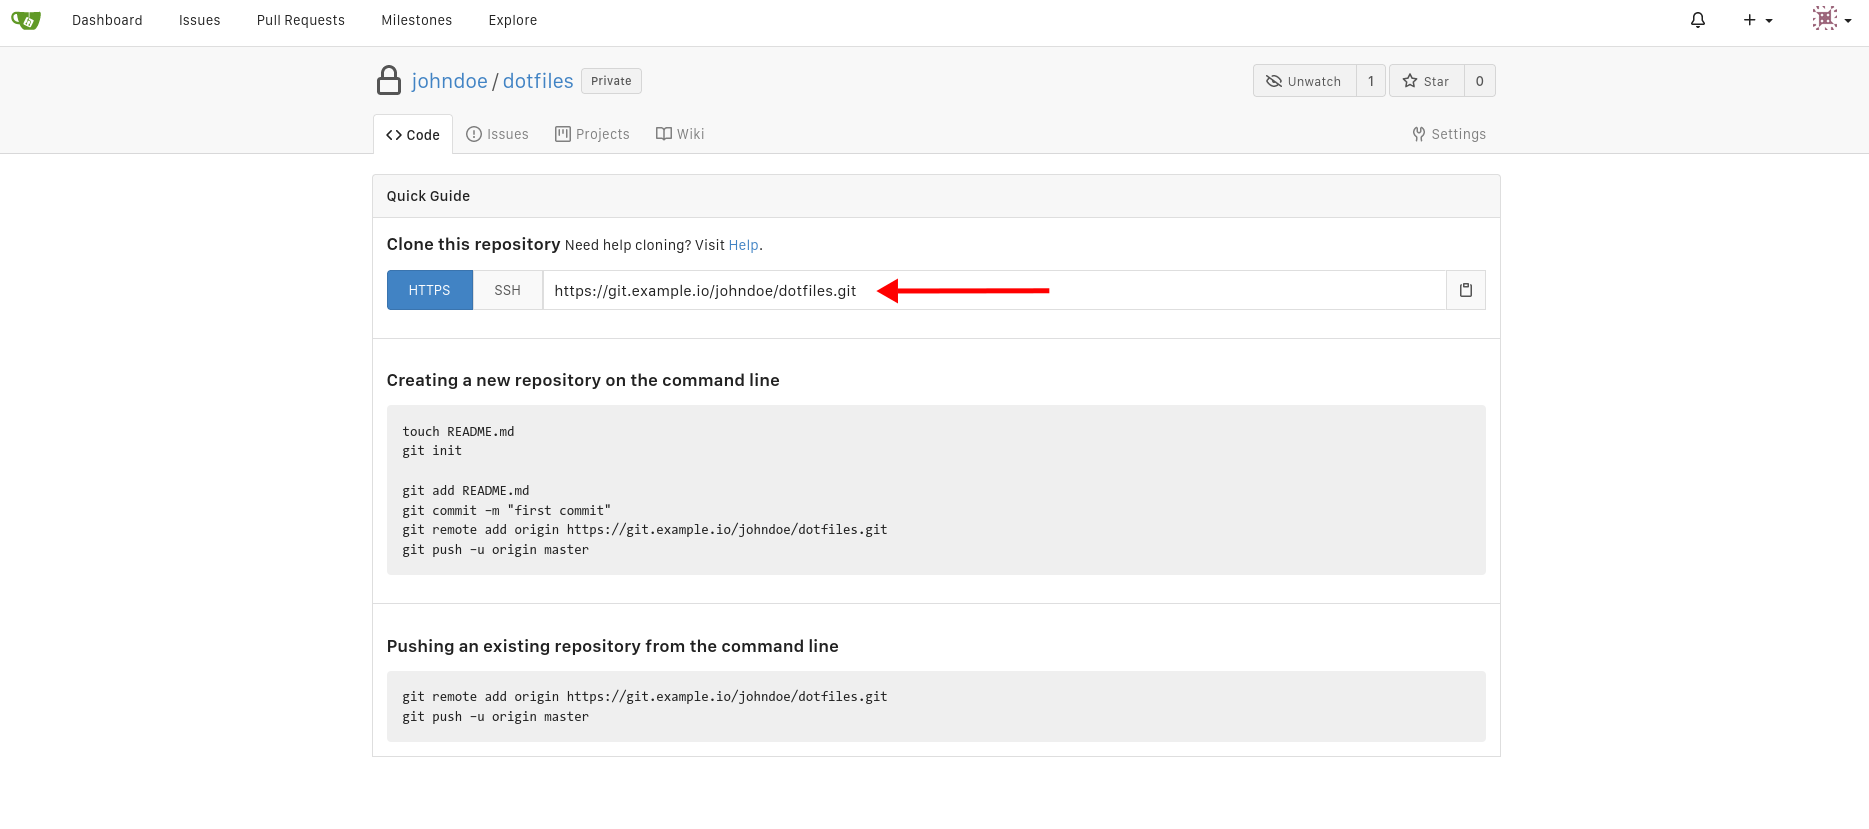
2. now you can initialize and set up the repository on your local computer. Then add some code and push it to your Gitea server.
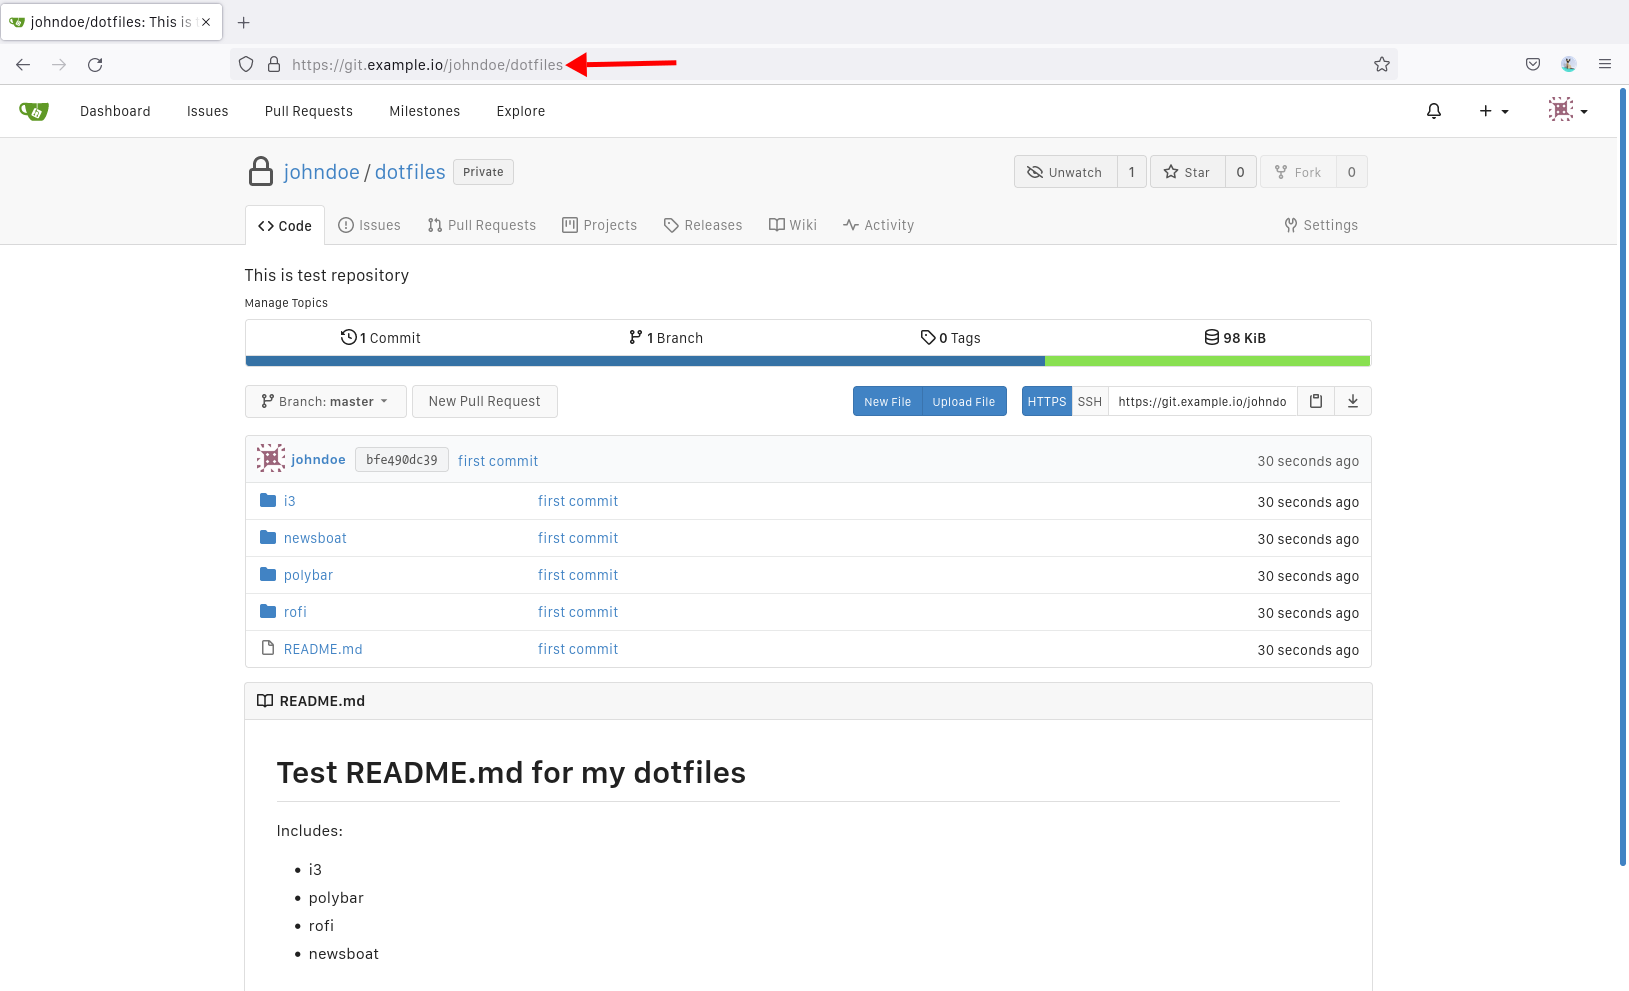
3. below you can see the example after adding new code and pushing it to the Gitea server repository.
Conclusion
Congratulations! You learned how to install Gitea with the PostgreSQL database and Apache reverse proxy on the Rocky Linux server. You also secured your Gitea deployment with SSL from Letsencrypt. You also created a new private repository on your Gitea service and transferred your local code from your computer to the Gitea server.