MariaDB is a popular open-source database management system used in many production systems. MariaDB was born after Sun Microsystems acquired MySQL in 2008.
MariaDB is written under the liberal open source GPLv2 license and is developed by some of the original developers of MySQL, who forked the project due to concerns over then-owner Oracle’s intentions with MySQL. MariaDB is a drop-in replacement for MySQL that uses the same SQL language to manage data. It offers many features of its predecessor but has been designed with scalability in mind, so you can enjoy increased performance even as your database grows larger over time.
As MariaDB’s development continues, several new features have been added, but most users will find it very similar to its predecessor MySQL. While there are many similarities between these two applications both technically and visually, some differences exist that you should be aware of before migrating your application or installing MariaDB.
Generally speaking, MariaDB is more feature-rich than MySQL. In addition, the MariaDB developers are more responsive to bug reports and feedback from users than was the case with MySQL and Oracle. However, if you are already familiar with MySQL, there is no real need to learn MariaDB unless you want to take advantage of its additional features.
Prerequisites
- In order to install MariaDB on Debian, you will need the following:
- A sudo user on your system (to install and configure MariaDB).
- A server or virtual machine with at least 2GB of memory to install MariaDB.
- A network connection to the Internet.
Updating the System
To make sure your system is up-to-date, run these commands. These commands will help you update the package list and upgrade any existing packages on your Computer or Server!
sudo apt update && sudo apt upgrade -y
Installing MariaDB on Debian 11
The official Debian 11 repositories have the latest stable version of MariaDB, which is version 10.5 as of this writing. So to install MariaDB, you will only need to run a single APT command.
sudo apt install mariadb-server -y
Configuring MariaDB on Debian 11
Once MariaDB is installed, you will need to configure it to secure and optimize your installation.
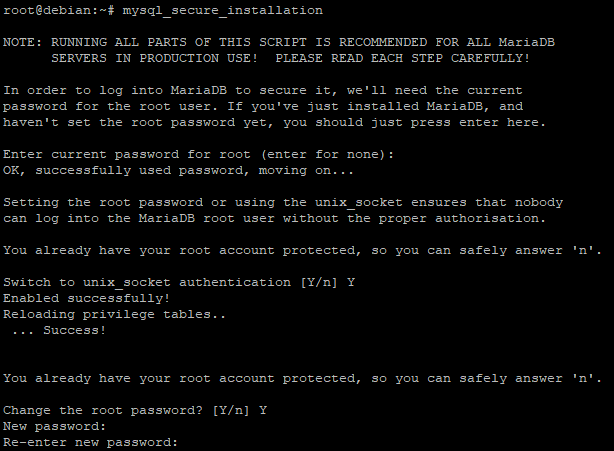
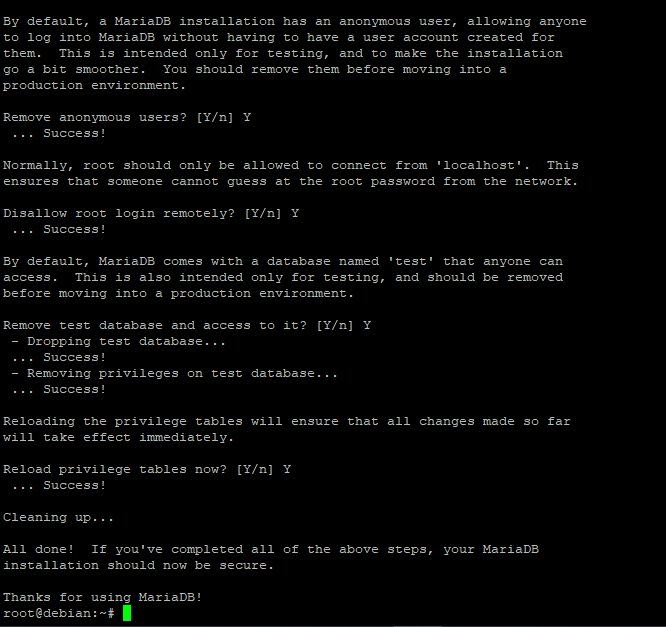
Secure MariaDB on Debian by running the command below. mysql_secure_installation script is used to secure the MariaDB installation. The script asks a number of security-related questions and then takes action based on your answers.
mysql_secure_installation
You will be asked to Enter the current password for root (enter for none). Since this is the first time you installed MariaDB, you will not have a password yet. Just press Enter at this prompt.
The next question is whether to use the unix_socket authentication plugin.
The unix_socket authentication plugin enables connections from local system accounts, so this is a good option to use. Type Y and Press Enter.
Next, you will be asked to change the root password. Type in a strong password for root and press Enter.
For the rest of the questions, you can type Y and press Enter to accept the default values.
Run the command below to start MariaDB with systemd. systemd is a service that manages daemons and services on a Linux system.
sudo systemctl start mariadb
Run the command below to configure MariaDB to start automatically when the system boots.
sudo systemctl enable mariadb
Your Linux systems can have a lot of services running, and it is not always easy to remember which ones need to be started. Though it is not always necessary, you can enable a service to start automatically when the system boots. This means that the next time the system loads, MariaDB will start.
It is strongly advised to enable a service this way as a general rule, unless there is a specific reason not to do so.
There are a few ways to check the status of MariaDB on Debian 11. The simplest way is to use the systemctl command with the status argument.
sudo systemctl status mariadb
This command will return the current status of the MariaDB service, which will be one of the following.
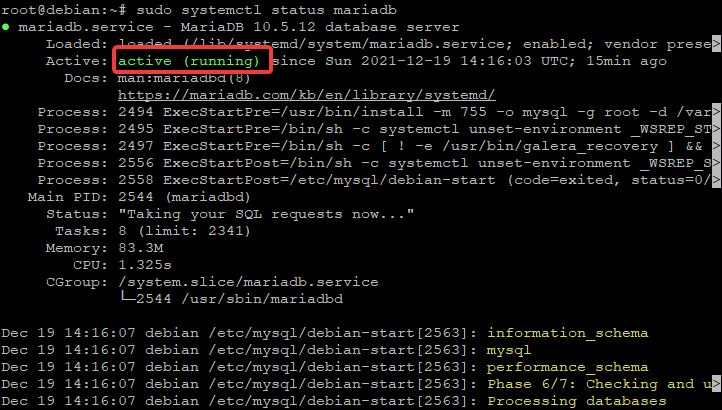
Active: active (running) indicates that the service is currently active and processing requests.
- Memory: 83.3M shows the amount of memory in use by MariaDB.
- Tasks: 8 shows the number of tasks or jobs it is actively processing.
- Limit: 2341 shows the maximum number of tasks that can be active at the same time.
- CPU: 1.325s shows the amount of CPU time in seconds that the service has used.
Creating an Administrative User in MariaDB
Now that MariaDB is set up and running, you will want to create an administrative user. This user will have full access to all of the databases on the server and will be able to create new users, databases, and grant privileges.
It is recommended that this user have a unique name. You can use the root user if you would like, but that is not recommended as every administrative task will be run with root privileges. This increases the risk of accidentally making a mistake.
Run the sudo mysql command to log in to the MariaDB shell. The MariaDB shell is a terminal interface that you can use to execute SQL commands. It provides a convenient way to manage your databases.
sudo mysql
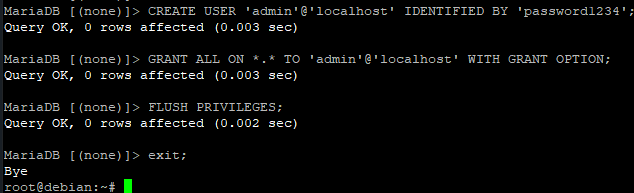
Next, in the MariaDB shell, run the CREATE USER statement below to create a new user. We will create a user named admin with a password of password1234. You can replace these values with whatever you would like. Notice that in the MariaDB shell, you need to use the semicolon at the end of a statement to indicate that you are done for that line.
Also, notice that the SQL statements are case insensitive , so you can type them in either upper or lower case without making a difference.
CREATE USER 'admin'@'localhost' IDENTIFIED BY 'password1234';
Next, run the GRANT ALL ON statement below to give your user full privileges. We are giving our user full privileges on all databases, tables, and columns. When using the * wildcard, it means “all.”
GRANT ALL ON *.* TO 'admin'@'localhost' WITH GRANT OPTION;
Next, run the FLUSH PRIVILEGES statement to apply the new privileges to your user. The FLUSH PRIVILEGES statement is used to clear out all the privileges that your system has been granted. This can be done before or after making changes. This statement tells MariaDB to reload the information about which users have what privileges and to take into account any changes that you have made.
FLUSH PRIVILEGES;
Finally, run the exit command to return to your shell prompt.
exit;
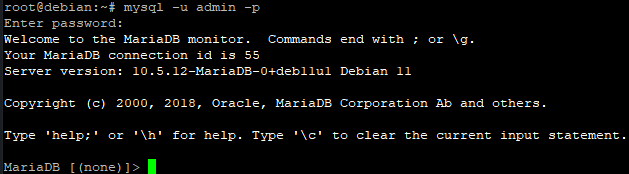
You can test that everything is working by logging in as your new user and checking the databases on the server. If you are using Linux, open another terminal window and execute the following statement. Replace admin with whatever username you choose for your administrative user. When prompted, enter password1234 for your password.
The -u flag is used to specify a username. In this case, we are using the admin user that we just created. The -p flag specifies a password for your user. In this case, we will be typing in password1234 which was the password for our new administrative user
mysql -u admin -p
You should now be logged in as the admin user and be able to execute any SQL commands that you like.
You now may exit out of the MariaDB shell by typing exit.
exit;
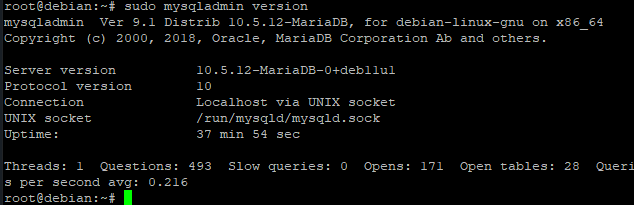
For double-checking, run the mysqladmin command to view the MariaDB version number.
The mysqladmin command is a utility program that you can use to administer your MariaDB server. It provides a convenient way to perform common tasks such as creating, deleting, and modifying databases and users. You can also use it to view the status of your server or to get information about the MariaDB processes that are running.
sudo mysqladmin version
Conclusion
In this article, we have shown you how to install and configure MariaDB on your Debian 11 server. We have also shown you how to create an administrative user and give that user full privileges on all databases. Finally, we have demonstrated how to use the mysqladmin command to view the MariaDB version number.
We hope you find this information useful.